Showing posts with label techniques. Show all posts

Monday, September 8, 2008

Instructor's Tip: Tips for Sharper Images


Enjoy this week's "Instructor's Tip" by award winning nature photographer Russ Burden. The photo(s) in this post were taken by Russ Burden. To learn more about how Russ captured this image, join him on one of his photo tours. Visit Russ Burden Photography to get more information.

Tips For Sharper Images

Let’s face it, we spend a lot of money on equipment. We purchase sharp lenses and we want our pictures to impart their maximum capabilities. In order to accomplish this, we must refine our picture making methods and techniques. This means proper camera handling, using a tripod as often as possible, using mirror lock up, shooting with proper shutter speed / aperture combinations, and using autofocus sensors properly.


TRIPOD: First and foremost, use a tripod to help ensure you get sharp images as the potential for camera movement during the exposure is significantly reduced as compared to hand holding.


APERTURE / SHUTTER COMBO: Aperture and shutter speed work both independently of each other and also in conjunction to create sharpness. If the action is fast and you want to freeze it, a high shutter speed is necessary. If lots of depth of field is important, you need to use a small aperture.


HAND HOLDING: If for whatever reason you can’t use a tripod, proper hand holding techniques will help you obtain sharp pictures. Use your focusing hand to support the camera and lens to create a firm base to prevent up and down movement of the camera. With your shutter hand, grip the body tightly to prevent left to right movement. Additionally, press the top of the camera against your forehead to further stabilize the system. Right before you press the shutter, inhale, tighten your grip, and gently press down.

-Russ


To take a class with Russ or a fellow Digital Photo Academy instructor in your area, check out the Digital Photo Academy. I took Russ' intermediate and advanced courses last year, and he continues to be a strong source of knowledge and encouragement as I progress in my photography.

Don't forget to check Take Great Pictures for Russ' most recent tips. On the home page, click on the "Photo Tips And Techniques" button in the left hand column. Additionally, check out his "Digital Tip of the Month" found by clicking on the Digital Photography button.

Monday, June 23, 2008

Instructor's Tip: Patterns In Nature


Enjoy this week's "Instuctor's Tip" by award winning nature photographer Russ Burden Burden:

"Mother Nature works miracles in what she creates. On a grand scale,
the sheer majestic beauty of the Teton range, the gorgeous array of
sea stacks along the Oregon coast, and the awe inspiring formations
of the desert South West leave many who witness these areas
speechless. On a small scale, the wonderment is no less amazing. The
intricacies of color within a flower, the intensity of hue of a
tropical fish, or the bark pattern of a bristle cone pine all equate
as works of art.

Patterns in nature can be swirls, flowing lines, repetitive shapes,
rounded or cornered off objects, colors, etc. Capturing them in a
pleasing composition with good light is necessary to create a
powerful photograph. With regards to composition, the key is to
reduce what’s in front of you to its primary components. Photography
is a subtractive art. The world in front of your viewfinder is filled
with clutter and confusion. Zero in on a selected part to reduce it
to a composition that’s pleasing. This is your task.

When approaching a potential subject, look for an area that’s clean
and has strong lines. Target this portion and begin to work it into a
composition. Look for a prominent focal point and place it in the
rule of thirds. Arrange the elements so lines lead the eye to the key
part of the image. As a rule of thumb, try to have the eye enter from
the lower left and be lead up and into the picture."

- Russ


The photo(s) in this post were taken by award winning photographer Russ Burden. To learn more about how Russ took the following photo in this post, join him on one of his photo tours. Visit Russ Burden Photography to get more information.

To take a class with Russ or a fellow Digital Photo Academy instructor in your area, check out the Digital Photo Academy. I took Russ' intermediate and advanced courses last year, and he continues to be a strong source of knowledge and encouragement as I progress in my photography.

Don't forget to check Take Great Pictures for Russ' most recent tips. On the home page, click on the "Photo Tips And Techniques" button in the left hand column. Additionally, check out his "Digital Tip of the Month" found by clicking on the Digital Photography button.

Tuesday, June 17, 2008

Q and A: More Things To Consider When Shooting Weddings


QUESTIONS: CANDLEMAN from Digital Photography School forum asks: "What was the most important tips/techniques you learned when you shot your wedding? I'm doing a wedding in 4 weeks and would be very interested...."

ANSWER: First all, good luck on your wedding assignment Candleman! I have really appreciated your encouragement on the DPS forum. This is a good question, and I really had to stop and think about my response.

As I finish up editing the shots from my first wedding assignment, several things seem to keep cropping up, forcing me to spend far more time editing than I should have. Things are moving pretty fast during a wedding, but if I would have taken more time at the beginning to slow down enough to be aware of what was in my viewfinder first and repositioning for better composition before I pushed the shutter, then I wouldn't be having such a hard time editing now.

1) Be careful of distracting backgrounds. Most of my post processing has been desperately trying to correct aspects of poor backgrounds, namely things that appear to be sticking out of people's heads (branches, bookshelves etc.) or things that just detract from the main subject (bright track lights on ceilings, unsightly things like trashcans etc). Sometimes I could save the image, but other times I had to ditch it.


The above photo is an example of what I'm talking about. I took this image at the bride's house when she was getting into the car to be driven to the church. I think this would have been a great photojournalistic-type image that would have provided plenty of memories for the bride about how heavy and cumbersome that dress must have been. She needed nearly constant help from her bridesmaids to keep the dress from trailing on the ground and it was difficult getting in and out of the car.

But take a closer look: That boat in the upper left hand corner of the image is a major distraction. I tried everything I could to clone that out, but I wasn't able to do so in a manner that I would have liked. This could have been solved by taking the image from another angle, maybe while standing in front and to the side of the vehicle shooting over the window at the bride and her helpers. Then I would have had those wonderful green vines and the brick house for a more uncomplicated, uniform background.

A wide aperture is your friend in situations like this too where a cluttered background could be blurred out, allowing your subject to stand out. Or try filling the frame with the subject to eliminate most of the background, whether it's distracting or not. I also like using a telephoto lens to move in close to the subject. Fill the frame and select the widest aperture to make the background soft and often awash with colors and light. This Kodak article also suggests staying away from bright colors and text (for example, store signs). I also like the suggestions this shutterbug.com article made regarding the use of flash to render a background black.

Some will argue you can use editing software such as Photoshop to blur the background, which is true, or even put in fake "studio-like" backgrounds especially if you are working on portraits. I've used that technique before, but it's always better to get it right in-camera first. Besides, that stuff can look very unnatural if you don't do it correctly.

2) Have a second or even third photographer if you can swing it. There was just too much going on to not have at least a second photog with me. I just don't know how a single photog can get all the candid and posed moments that happen during a wedding. I am so thankful for having those extra pairs of eyes and perspectives to get as many storytelling shots as possible

3) Avoid shooting portraits in bright, direct sunlight. It's always best to put people in shady or evenly lit areas so they don't squint or end up with those racoon shadows under their eyes and noses. Far too much editing time has been spent on healing hot spots on foreheads, cloning out those undereye shadows and dealing. Also, have people remove their glasses if possible so you don't have to deal with those flares that show up in the frames.

4) It ain't all about the bride! Remember to get shots of the groom and his family's reactions to the wedding. I put one of my photogs solely on the groom for that day's worth of coverage so his relatives and friends will be more likely to buy photos and albums as well.

Monday, June 16, 2008

Instructor's Tip: Reflections


Enjoy this week's Instuctor's Tip: "Reflections," by award winning nature photographer Russ Burden Burden:

Reflections can be found on many different surfaces. Glass buildings,
mirrors, mylar, chrome bumpers, and puddles to name a few. All
provide the opportunity to produce creative images. Some provide
smooth and uninterrupted surfaces while others add a rippled texture
giving variations of the reflected effect. In the natural world, the
diversity of mirrored surfaces isn’t as vast narrowing the amount of
photographic opportunities. Nature photographers often rely on still
water for the effect. This mandates no wind. Early mornings and late
evenings are the best times to find this condition. A bonus is the
light at this time of day is warm and directional.

Still water reflections provide the nature photographer with great
opportunities to make gorgeous images. I encourage you to use a
graduated neutral density filter to even out the difference in
exposure between the reflection and top area of the photo.
Inevitably, the reflected part will be darker by as much as three
stops. With this in mind, I carry one and two stop versions on all my
workshops. I take a meter reading of both the actual and reflected
portions. If the difference is one stop, I use the one stop filter.
If it’s two stops, I use the two stop filter and for those times when
there’s a three stop difference, I combine the one and two to give me
three stops of filtration.


The photo in this post were taken by award winning photographer Russ Burden. To learn more about how Russ took the following photo in this post, join him on one of his photo tours. Visit Russ Burden Photography to get more information.

To take a class with Russ or a fellow Digital Photo Academy instructor in your area, check out the Digital Photo Academy. I took Russ' intermediate and advanced courses last year, and he continues to be a strong source of knowledge and encouragement as I progress in my photography.

Don't forget to check Take Great Pictures for Russ' most recent tips. On the home page, click on the "Photo Tips And Techniques" button in the left hand column. Additionally, check out his "Digital Tip of the Month" found by clicking on the Digital Photography button.

Sunday, June 1, 2008

Get the Job Done: First Wedding A Success!


Whew! Man am I exhausted! I have to say that shooting yesterday's wedding was by far one of the most challenging photography experiences I've ever had. Not only was my brain done in Saturday, but my muscles were sore and taunt as if I'd run a marathon. Of course I didn't feel any of this while I was working. Adrenaline must have kept me going. But the enormity of the event hit me as soon as we stopped, and Mike was driving us home. I could barely bring myself to speak as the excitement drained away and all that was left was fear and worry. I stared blankly out the window while Mike held my hand. I kept thinking: "God I hope I did a good job. Please don't let me have messed this up."


But I can now say with great certainty though (after spending most of Sunday editing) that I think Jason, Mike and I did a great job covering my first official wedding assignment! The photos are fabulous and it's going to be very hard to narrow it down to only the 100 or so best.


I couldn't have done this without Jason and Mike. How does any one wedding photographer working alone get the job done? There is so much going on that I think it would have been a disservice if I tried to tackle this alone. There were simply times when I didn't have the best angle, but Mike did. While Jason drove to Watkins to be with Jordan, the groom, Mike and I hightailed it to Englewood to be with Tolisa, the bride. While I shot the bride and her bridesmaids getting dressed in the basement, Mike shot the bride's father and other male relatives outside.


My flash started to die right when I was supposed to be shooting the rings, so Jason and Mike stepped up to shoot. When the dancing started, I was on the ground while Mike took some amazing shots with an entirely new perspective from above, shooting off the balcony. The triple team idea was fundamental to making this a success.


I had the best young couple to work with. Tolisa and Jordan were fun, adventurous and up for anything. Capturing their happiness was easy. I'll never forget the moment after the ceremony was over, when the couple ran out of the church. I followed them and witnessed a memorable moment: while standing alone in front of the church, Jordan gripped Tolisa's hand and they quietly prayed together for strength in their new journey together. (I kept shooting the whole time...hope that was OK!)


Now here's the bad news: Between the three of us, we must have taken nearly 3,000 shots. Can somebody say OVERKILL! It's going to take a herculean effort to edit all of this, so I think I better get ready to "kill some babies." That's the term we use in the newsroom when a reporter has the terrible job of cutting their own stories down from 60 inches to 25. Those stories are often as dear to a reporter's heart as their own child. To have to edit anything can be an almost painful experience because you are so connected to each word, each sentence. I sorta feel that way about these photos, so I better prepare myself for the difficult process of culling them down.


One of my instructors Efrain asked me what "major catastrophes" did I encounter, what lessons did I learn and what went so well that I'm beside yourself? I'd have to say that should I get another wedding assignment, I and my assistants will have to be pickier about the shots we choose to take. I think that's the only way to avoid walking away from the event with thousands of photos.


I will surely be charging more, too. I completely understand why so many wedding photographers have high prices for their wedding services. Shooting a wedding is tough. You have to be quick on your feet, moving around constantly. And the work isn't done when the bride and groom leave -- we easily are talking about several hours of more work to edit these photos and give them a cohesive look.


I was paid upfront for my services while at the reception, and the bride as agreed to pay extra for a CD of all the images, but my greatest worry now is that I won't make enough money in print sales to even cover the cost of renting the 30D. Several people asked for business cards, so that could mean some business later. The groom's father needs promotional shots for his Christian ministry (he has a daughter getting married in Oklahoma that he asked me to shoot, but I'm not so sure about that assignment!) I will definitely have to look at this as more of a portfolio-padding, learning experience.

Wednesday, April 2, 2008

Get the Goods: Nikon D80 Special Users Seminar

Nikon professionals will be hosting a special in-depth seminar for Nikon D80 Digital SLR Camera users this month in Denver.

Professionals will discuss the buttons, menus, lenses and techniques of capture great pictures with the Nikon D80. Get your recipe for better pictures in a step by step "how to" instruction.

WHEN: Thursday, April 17, from 7 to 10 p.m.
WHERE: Four Points Sheraton, 6363 E. Hampden Avenue, Denver, 80222
COST: $50 per person, but the price includes a $25 gift card good at Ritz Camera Center store, including Wolf Camera.

Tuesday, April 1, 2008

Get the Job Done: Ten Tips for Dynamic Image Design

In their monthly newsletter, American Photo and Popular Photography & Imaging's "Mentor Series Worldwide Photo Treks" offered readers these tips for designing dynamic images:


"Ten Tips for Dynamic Image Design

One of the things that separates a great photograph from a snapshot is the effort that the photographer put into designing the image. How many times have you looked at a great photograph of a very ordinary subject and marveled at the inventiveness that the photographer used in composing the image? And that is what image design is all about: being inventive in not only what you include in the frame, but how you place it in the frame and what tricks you use to emphasize certain aspects of the subject.

Below are ten quick tips that you can use to create more dynamic and interesting photos. If you apply just a few of these to your images, you’ll vast improvements in the “wow” factor of your photos almost immediately:


Use Selective Focus:

If you can’t simplify a subject by moving it (or moving yourself), you can toss a background out of focus by using a slightly longer lens and a wide aperture.
Play with Subject Placement:

It’s human nature to try and center subjects in the viewfinder (after all, that’s where the focusing indicators are) but break the habit. Place subjects high or low or radically to the left or right and you’ll add an element of power and surprise to your pictures. By placing this surfer in the lower right part of the frame, I was able to focus attention on him and yet show the environment as he was seeing it.


Simplify:

If a viewer has to ask what it is you were taking a picture of, you’ve blown the opportunity. Pare down each composition to its bare essentials. Less is always more.


Move Closer:

One quick way to simplify any subject is to move closer to it. We tend to concentrate so hard on what is in the viewfinder that we think it’s larger than it is. As long as you’re not standing on the end of a dock, try taking a step closer even when you think you’re close enough.


Use Unexpected Angles:

Because we usually view the world from eye level and straight ahead, that’s how most of us compose pictures. Instead, try to imagine how a cat might see the world looking up at a rose bush instead of down at it. Kneel down on the ground, hop up on a porch or walk around behind a subject and shoot it from behind. The element of surprise is a wickedly powerful design tool.


Use a Plain Background:

Busy or chaotic backgrounds confuse the viewer about what you’re trying to shoot. If you’re photographing a subject that you can move, such as a person, find a plain background like a brick wall to simply the shot. Or circle the subject looking for a more plain backdrop. To get this photograph of a sunflower, I changed my position so that the background was a dark area of shadow and then I exposed for the sunflower only.


Vary Your Formats:

Just because your camera was design in the horizontal doesn’t mean you have to always hold it that way! Turn the camera vertical and try to think as a photojournalist: always looking for the great vertical shot for the cover of the magazine! Many subjects work well in either format, so take the time to shoot both and decide later which works best.


Create a Sense of Depth:

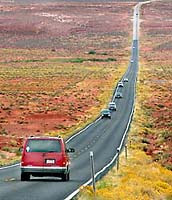
Use leading lines or “linear perspective” as it’s called to draw the viewer’s eye into the scene. Roads, lines of trees, telephone wires—anything that pulls the eye deeper into the scene will create a sense of distance and also lure the eye into exploring within the frame


Use a Frame Within a Frame:

Landscape photographers often use frames within frames to focus attention on a particular part of a scene (using a stone archway to frame a garden, for example) and it’s a very effective technique. But frames can also be used with other subjects, such as portraits—framing a shot of a farmer by shooting out at him from inside his barn, for instance. Frames are also an excellent way to hide distracting surroundings.


Create a Sense of Balance:

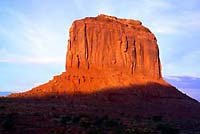
Most photographic compositions contain a variety of “strong” subjects (dark or large objects, for instance) and a certain amount of “weaker” ones (the sky, open lawns, etc.). Finding a balance between these so that one doesn’t dominate the other is a delicate but important aspect of image design. Try using large areas of light sand, for instance, to balance a large dark rock formation on a beach or use a large area of sunset sky to balance off the weight of a large sailboat in silhouette. In this shot of Merrick Butte in Utah’s Monument Valley I balanced the large bright area of red rock with a dark area of shadow caused by the sun going below the rim of the valley."

Monday, March 31, 2008

Instructor's Tip: Side Light for Scenics


Enjoy this week's Photo Tip by instructor Russ Burden. To take a class with Russ or a fellow instructor in your area, check out the Digital Photo Academy. I took an intermediate and advanced course with Russ and he has continued to be a strong source of encouragement and education as I have progressed in my photography.

Don't forget to check Take Great Pictures for Russ' most recent tips. On the home page, click on the "Photo Tips And Techniques" button in the left hand column. Additionally, check out his "Digital Tip of the Month" found by clicking on the Digital Photography button.

To learn more about how Russ took the above photo, join him on one of his photo tours. Visit Russ Burden Photography to get more information.

Side Light For Scenics
"The direction of light is very important in determining the success
of an image. Whether the subject is lit by flash, room light, or
illuminated by the sun, if the angle is wrong, the photo will fall
short. Frontlight falls squarely on the subject. This direction of
light is very flat. Backlight produces silhouettes which limits the
detail in the photo. Sidelight hits the subject at a ninety degree
angle. The result is an image with strong highlights and shadows.

Frontlight can be beneficial with certain subjects. Wildlife is a
great example. While running my photo tours, when the opportunity to
photograph a terrific specimen of an animal presents itself, I tell
my participants to aim their shadow toward the animal. The more
perpendicular it is, the more direct the front light. Backlight can
be dramatic and create mood in an image. If a subject’s outline is
easily identifiable, a silhouette offset against a vibrantly colored
background can produce a gorgeous photo. But for scenic photography,
the best light is sidelight.

Sidelight for scenics is beneficial for many reasons. To begin, the
sky behind the subject will have maximum polarization. This allows
the sky to pop off the page as the colors and tones become rich and
saturated. Sidelit subjects are lit at this angle. To determine the
angle of light at sunrise or sunset, face the direction in which your
shadow is falling. Turning ninety degrees to your left or right of
this direction is where sidelighting occurs."

- Russ

Tuesday, March 25, 2008

Get the Goods: Photoshop Basics -- Digital Photo Workflow

Monday night, I took a Photoshop 101 course with the newly established Illuminate Photography Workshops. Even though I completed an online Photoshop CS2 course last year, I thought I could fill in some of the gaps with hands-on, traditional instruction. Plus I enjoy being able to interact with and learn from fellow students.

Instructor Nathaniel Coalson is an Adobe Certified Expert and was extremely knowledgeable. He helped me pinpoint some shortcomings in my own digital photo workflow -- mainly how I should integrate backups and save my master files as TIF (rather than PSD) to avoid compression and maintain original resolution.

I think what's key to note is that you have to develop a workflow that works for you. Feel feel to tweak this as long as whatever you come up with makes things easier and faster for you to produce the best images possible.

Here are Coalson's tips:

1. Capture: Capture your photos in either RAW or JPG mode. RAW provides the highest quality but requires processing in the computer. JPG is lower quality but can be viewed and shared (such as in email attachments) right from the camera.

2. Transfer Images to Computer: Use a card reader (do not upload directly from camera) and copy the files to your computer. Immediately make a backup onto another hard drive or removable media such as CD/DVD. Depending on the software available, you can automatically rename the copied files, convert to other file formats and add metadta during the copy. If using catalog software, import the images into your database during this step.

I MUST get into the habit of backing up my images as soon as possible. I tend to wait until I have finished editing, then I save the edited versions. But I like Coalson's idea of fitting this early into the workflow so it becomes as second nature to me as sharpening or editing for color balance.

3. Review your edit: Use your file browsing software to review the photos from the shoot(s) and begin rating them for further processing. Mark your selects with flags, stars, labels, etc. to filter them from the rejected files. Delete the rejected files to save disk space. For the remaining images, add more detailed metadata, especially copyright notices and keywords. Sort the images as desired and create collections.

4. Process selects: Using your photo editing software, process your selected images to perfection. Consider tone and contrast (the range of light to dark) color (accuracy and saturation), sharpness and the need for cropping and retouching. Apply creative effects such as black-and-white conversion, colorizing, multiple image composites, localized dodging and burning in this step.

5. Save master and derivative files: A derivative file is any file that would be saved off your master. Using Adobe software, open your file and "Save As" a TIF. TIF files work with the nondestructive editing principle that says to leave a way for yourself to go back in later and make changes. You can also save flattened and resize files for other purposes, including JPG for the web, etc. If you intend to make prints of your photos, prepare the necessary files during this step. Make regular backups of your working files.

I asked Coalson about some problems I had been having saving PSD files in CS3. I could save an image as a PSD, but I had trouble reopening the file. Sometimes it would appear and other times it wouldn't. Coalson said the problem is well-known and yet another reason why TIF files might be a better choice.

6. Print and Present: Using your finished image files, you can make your own prints or send them to a lab for printing, uploading them to a web site, email them to friends, make multimedia presentations, etc. The requirements and specifications for these scenarios will depend on the situation.

Thursday, March 6, 2008

Get the Goods: Gary Fong's Lightsphere


Yesterday, my new Gary Fong Lightsphere flash diffuser showed up at work. Just being able to get this piece of equipment was worth forcing my flu-ravaged butt out of bed and back into the office. While some of my colleagues have complained that the Lightsphere (and most of Gary Fong's other inventions) look ridiculous and are hard to store in a camera bag, I think they are just bitter because they don't have one yet.

So far I think I'm in love with this diffuser for the almost studio quality softlight it produces. I have yet to use it on a human subject, but my cat Nikita was willing to model for me, well sorta. I had to capture her attention with a straw, but whatever works when it comes to getting a cat to pose for you.


Without the Lightsphere


With the Lightsphere


My 580 EX II was able to light up my darkened bedroom, but clearly, using the Lightsphere lends more detail, depth and texture to Nikita's fur. It also was worth my time to watch the DVD tutorial that came with the equipment. It includes interviews with Gary Fong demonstrating the best ways and appropriate situations to use the Lightsphere and its companion pieces, the chrome and amber domes and the inverted dome for an extra power boost. Smugmug customers get a great discount, so I think this equipment was a steal for less than $150. I can't wait to practice with it on a human subject for portraiture.

Saturday, March 1, 2008

From My Portfolio


One of the best compliments I have ever received came from a newsroom colleague: "I don't think I've ever seen Bishop so alive and animated before." My colleague was talking about some portraits I took of Terilynn's shy and introverted son, Bishop. Having the opportunity to reveal a rarely seen side of this beautiful child was incredibly rewarding.

You might remember this image of Terilynn and her daughter Avery (it has become my signature shot). Before I took portraits of Teri, her husband and four children, I spent time at Teri's informal birthday party getting to know her family so they would be more comfortable with me when I brought them into my home studio a few days later. The key with shooting Bishop, and I believe all children, is allowing them to be them. Initially, Bishop seemed afraid of my camera, so I let him gently touch the lens and ask questions about my equipment. After that, I followed the children into the backyard and simply watched them play, snapping shots here and there. I wasn't too concerned about the images I took at that moment. I just wanted them to get used to me being in their space. I adjusted my settings to the wonderful late afternoon sunlight as I went. If they wanted me to take a picture of a flower they found in the garden, I did, making sure to show them the digital image immediately afterward. Soon, they were calling me "the camera lady" and asking me to take pictures of them jumping and running and throwing horse shoes.

So when Bishop decided he wanted to see if he fit inside this plastic storage bin, I was ready for a great shot. He was comfortable and at ease, and I think the resulting images show that. I shot this at f10, 1/200, ISO 200. If I were to take it again, I might use a shallower depth of field to blur out the grassy background, maybe at f4. Not every situation will allow a photographer that kind of quality time with a young subject. But when ever children are involved, it will be worth any time you have to spare getting to know them better.

Need more tips? Joel Sartore, a National Geographic magazine photographer, shared these ideas in the book "Photographing Your Family" (National Geographic Society, $24.95) featuring his work:

1) Consider what the child likes to do. Do they ride tricycles around the dinner table or wear a Superman outfit everywhere? Keep a camera handy to capture those moments before a child outgrows those antics.
2) Get down (or up) on the subject's level to create more intimacy and take advantage of great compositional angles.
3) People will do more interesting stuff if you let them do their own thing rather than direct them. Pretend to be looking at the camera, or fixing it, and take a few frames. You'll get more interesting pictures that way.

Best Posts

Picture Your World Photography is a premiere photographer in the Denver, Colorado Photographer community on MarketingTool.com.