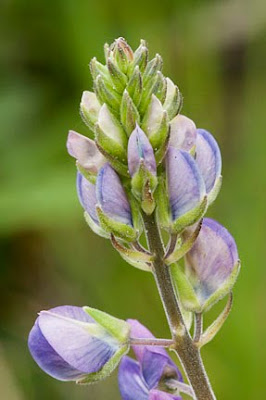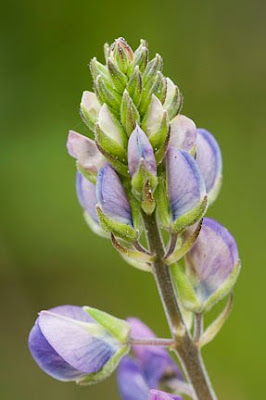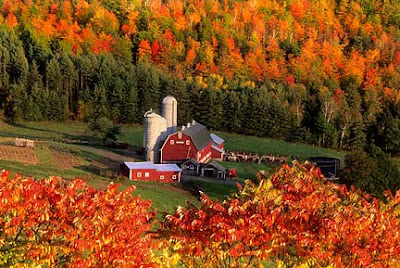
I hope you enjoy this week's "Instructor's Tip" by one of my favorite instructors, award winning nature photographer Russ Burden. To learn more about how Russ captured the above image, join him on one of his photo tours. Visit Russ Burden Photography to get more information.
Photo by Russ Burden
Depth Of Field Basics - Part 2
Controlling the Depth of Field: With regards to focal length, the wider the angle of the lens, the more inherent depth of field it will produce. If the goal is to create images with lots of depth of field, stick with wider lenses. Conversely, as one progresses from medium to long telephotos, the depth of field becomes more and more narrow. This is why many landscapes are made with wide angle lenses and portraits are made with medium telephotos. Once you get to 300mm and greater, depth of field becomes very narrow and careful placement of the focusing sensor over the area of the subject that is most important is critical.
The last two factors that impact the range of sharpness both deal with distance. The closer you get to your subject, the more the background and foreground fall out of focus. This happens because the lens has to focus closer to its closest focus point which translates to distant elements falling out of the range of focus. The same principal holds true given the relationship of the distance of the subject from the background. If the subject and background are close to each other, then the proximity of all elements is such that most everything is sharp. Conversely, if the subject is moved far away from the background, the lens isn’t able to sharply render both the subject and the background which is far away. Both of these effects are enhanced using a telephoto lens with a low number f stop and both are reduced using a wide angle lens at a large number opening.
Take a class with Russ or a fellow Digital Photo Academy instructor in your area, check out the Digital Photo Academy. I took Russ' intermediate and advanced courses last year, and he continues to be a strong source of knowledge and encouragement as I progress in my photography.
Check out Burden's "How To Tips" featured on Outdoor Photographer's website. The seven that are dated February 4th are his. Just underneath the articles, be sure to click on page 1 to see an additional 9.
Don't forget to check Take Great Pictures for Burden's most recent tips. On the home page, click on the "Photo Tips And Techniques" button in the left hand column. Additionally, check out his "Digital Tip of the Month" found by clicking on the Digital Photography button.
To learn more about this subject, join Burden on one of his photo tours.
Monday, March 29, 2010
Sunday, March 28, 2010
Get the Job Done: Two NBS galleries posted
Did you attend an National Brotherhood of Skiers 2010 AMCC Summit Happy Hour or the Pajama Party? Check out photos from those two events now. Two new galleries of images have been posted on the Picture Your World Photography website.
To purchase a photo, click the BUY tab on the upper right hand corner of each individually displayed photo.
Choose either to buy "This Photo," or "Photos in this gallery" or "Package from this Pro."
Choose prints, merchandise or digital downloads placed directly on your computer for you to print or share yourself.
Pajama Party Gallery
Password: Winter Park
Happy Hour
Password: Winter Park
Use this special event link to check page when photos are posted from the Picnice on the Hill, Challenge Cup Race Winners, the Comedy Show and other summit events.
Labels:
2010 AMCC Summit,
buy photos,
Get the Job Done,
happy hour,
National Brotherhood of Skiers,
pajama party
Saturday, March 27, 2010
Saturday Morning Cartoons
Here is my favorite "What the Duck" comic from this week. Rock on Aaron! "What the Duck" is an online comic strip created by Aaron Johnson. I just love how Aaron's wry sense of humor reflects the current state of the photography industry. But what really freaks me out sometimes when I read his strip is how much they reflect whatever situation I'm currently experiencing too...whether it's working with clients or desperately trying to stay on top of technology like Facebook or Twitter or a host of other things that all add up to being a professional photographer.
The genius of his strip is the way viewers can interact with Aaron and his comic character. Folks are welcome to link, post, copy/paste, or save the strips to their own sites, blogs, forums, newsletters, etc. Aaron also allows viewers to suggest titles for his individual strips, and post photos of their own plushy and stuffed W.T. Duck working or hanging out.
Labels:
Aaron Johnson,
comic strips,
comics,
online comic strip,
photography comics,
photography humor,
Saturday Morning Cartoons,
What the Duck
Wednesday, March 24, 2010
Get the Job Done: Photographing the Council on Foundations annual conference in Denver
Today I received my service agreement contract to be the official event photographer at The Council on Foundations Annual Conference being held in Denver, April 25-27! Even though I was contacted about this last week, I didn't want to announce it on my blog until I knew if I had been awarded the contract.
When I spoke with the organization's public relation's director, I asked her how did she find me. I was pleased when she said Picture Your World Photography appeared on her Google search for a "Denver event photographer." It's good to know that all that time I've spent learning about SEO and how its techniques can benefit my studio has paid off. "Plus, I thought the name 'Sheba' had a good, earthy sound to it, too!" For that, I guess I can thank my father, since he got to name me! :)
The Council on Foundations is a membership organization serving national and international grantmakers, family foundations and corporate giving programs. This year's annual conference will feature keynote addresses by Former Vice President Al Gore who served with the Bill Clinton administration 1993-2001 and Admiral Mullen, the 17th Chairman of the Joint Chiefs of Staff, the principal military advisor to the president, the Secretary of Defense, the National Security Council, and the Homeland Security Council. Because of such high profile speakers, I will have to endure going through tons of security. All of the speakers seem very interesting and I can't wait to be apart of this event. Other speakers include Valerie Jarrett, senior advisor and assistant to the president for Public Engagement and Intergovernmental Affairs in the Obama administration; Geoffrey Canada, president and CEO of the Harlem Children’s Zone; Patrick Corvington, CEO of the Corporation for National & Community Service; Chip Heath, co-author of “Switch: How to Change Things When Change Is Hard;" and Douglas Shulman, the 47th Commissioner of Internal Revenue.
Shooting event photography gives me the chance to flex my developing photojournalist muscles. Not only do you have to be a master of your equipment, but you have to be a master at interpreting decisive moments and showcasing them in storytelling photography. My three years spent as the official photographer for the National Brotherhood of Skiers has definitely honed my skills for coverage of the council's conference. However, a major difference in this event is that I will have to quickly turn over high res images at the end of each day of coverage so the council can use them as updates on their website. That means I've got to get as much as I can right in camera from the start instead of relying on time consuming fixes in post. I think I will also take advantage of some batch process editing tools and plugins as well in Lightroom and Photoshop. All told, I can expect about 25 hours worth of work from the three-day event, including shooting conference attendees, key note speakers, other VIPS, receptions, and workshop sessions. Wish me luck on this wonderful opportunity!
Labels:
Al Gore,
conferences,
Council on Foundations,
denver event photographer,
Get the Job Done,
Michael Mullen,
photojournalism,
special event coverage
Monday, March 22, 2010
Instructor's Tip: Depth of Field Basics, Part 1
I hope you enjoy this week's "Instructor's Tip" by one of my favorite instructors, award winning nature photographer Russ Burden. To learn more about how Russ captured the above image, join him on one of his photo tours. Visit Russ Burden Photography to get more information.
Photos by Russ Burden
DEPTH OF FIELD BASICW - Part 1
When it comes right down to it, depth of field is synonymous with range of focus. It only seems natural that a photographer would want to produce a picture with a wide range of focus, but this is not always the case. If everything in the image is tack sharp, it tells the viewer to look at every detail and that every detail is important. Conversely, if only certain subjects in the image are sharp, the viewer is drawn to those areas and the rest of the elements become secondary. In the case of landscapes, images work better when everything is sharp from the foreground to the background. But for portraits, and many other subjects, the image is more successful if just the main subject is sharp and the remaining elements fade into softness. So how does a photographer create specific ranges of focus?
Depth of field is controlled by a combination of the following: the f stop used to make the picture, the focal length of the lens, subject distance from the camera, and subject distance from the background. With regards to f stop, the higher the number of the f stop, the greater the depth of field. In other words, with all other factors being equal, f22 will create much more depth of field than f4. This translates to a more sharply rendered foreground and background. With this in mind, as a guideline, for landscapes use f stops closer to f22 and for portraits, use those close to f4.
Take a class with Russ or a fellow Digital Photo Academy instructor in your area, check out the Digital Photo Academy. I took Russ' intermediate and advanced courses last year, and he continues to be a strong source of knowledge and encouragement as I progress in my photography.
Check out Burden's "How To Tips" featured on Outdoor Photographer's website. The seven that are dated February 4th are his. Just underneath the articles, be sure to click on page 1 to see an additional 9.
Don't forget to check Take Great Pictures for Burden's most recent tips. On the home page, click on the "Photo Tips And Techniques" button in the left hand column. Additionally, check out his "Digital Tip of the Month" found by clicking on the Digital Photography button.
To learn more about this subject, join Burden on one of his photo tours.
Labels:
Digital Photo Academy,
digital photography tips and techniques,
Instructor's Tip,
Outdoor Photographer,
photo tours,
photography tours,
Russ Burden,
Take Great Pictures,
techniques tips
Saturday, March 20, 2010
Get the Job Done: Check out my photo in the Denver Post!
Photo by Sheba R. Wheeler, The Denver Post
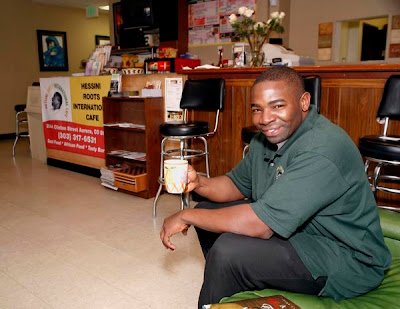
A portrait shot I took of restaurateur Ifiok Etuk appeared in the Denver Post today! Etuk is the man behind "Iffy's Kitchen," an Auora nonprofit program dedicated to ending childhood hunger. Today Etuk, a 36-year-old native of Nigeria, will host the second annual Celebration of Children at his restaurant, the Hessini Roots International Cafe. The two-part event includes a free hot meal for kids during the afternoon and evening entertainment to raise money for future anti-hunger efforts. Read Kat Valentine King's article here.
This was an amazing experience for me. I got to work alongside news reporter Annette Espinoza who interviewed Etuk while I shot photos of him in his cafe. I felt like a real photojournalist. But at the same time, I felt like a portrait photographer, scanning the scene for the best possible light (which ended up being in direct light from a nearby from the window storefront) and looking for opportunities to showcase the cafe surroundings as well. I used flash bounced from the ceiling and indirect sunlight for all of the images.
I really appreciated getting feedback from my assigning editor, Elana Jefferson, on which photos she liked and which one was ultimately chosen. Her insight will help me improve my shooting whenever she needs an image again and our newspaper staff photographers aren't available for the shoot.
Labels:
Get the Job Done,
Iffy's Kitchen,
Ifiok Etuk,
The Denver Post
Saturday Morning Cartoons
Here is my favorite "What the Duck" comic from this week. Rock on Aaron! "What the Duck" is an online comic strip created by Aaron Johnson. I just love how Aaron's wry sense of humor reflects the current state of the photography industry. But what really freaks me out sometimes when I read his strip is how much they reflect whatever situation I'm currently experiencing too...whether it's working with clients or desperately trying to stay on top of technology like Facebook or Twitter or a host of other things that all add up to being a professional photographer.
The genius of his strip is the way viewers can interact with Aaron and his comic character. Folks are welcome to link, post, copy/paste, or save the strips to their own sites, blogs, forums, newsletters, etc. Aaron also allows viewers to suggest titles for his individual strips, and post photos of their own plushy and stuffed W.T. Duck working or hanging out.
Labels:
Aaron Johnson,
comic strips,
comics,
online comic strip,
photography comics,
photography humor,
Saturday Morning Cartoons,
What the Duck
Breaking News: Facebook Fan wins a free 2 hour photo shoot
DRUMROLL PLEASE: Facebook Fan Franklin E. McDaniel is this month's winner of free two-hour photo session! Using a random number generator, I painstakingly counted through my fan list to figure out who the heck was No. 163. Congratulations Franklin and thank you for your support of Picture Your World Photography.
I will be holding a drawing every month for one lucky fan to win their own free session. So become a studio fan now for your chance to win. Keep the session for yourself or give it as a gift (retail value $150). Just pay for prints of any images you love!
Thursday, March 18, 2010
Breaking News: 300 Facebook Fans!
Photo credit: www.blogtrepreneur.com
Just today, the Picture Your World Photography Facebook Fan Page experienced a major accomplishment: We now have more than 300 FANS!
In celebration of this feat, I will host a drawing in which one lucky fan will win a free two hour photo session! My studio wouldn't be where it is today were it not for the continued support of friends sharing the world about my business to their friends. More than 95 percent of my clientele have been referrals. And my business income has doubled since last year! Thank you to everyone who has and continues to support.
I've been considering offering this exclusive drawing once a month for a while, but I wanted to hit another advertising milestone before I did so. It's the least I can do to honor my fans.
Check back this weekend to see who wins! I will use a random number generator to choose one winner! If you haven't become a studio fan, do so TODAY for your chance to win a free photo session.
Labels:
exclusive photography discounts,
Facebook fan page,
facebook fans,
fans only,
free photo session drawing
Wednesday, March 17, 2010
Get the Job Done: Attending a Model Posing Workshop
Tonight I will be attending a workshop geared less towards lighting and more towards posing the model. Several past attendees of Bill Murphy's "Basics of Studio Lighting" Meetup mentioned they could use some help learning how to work with models and get some unique poses. So Bill is going to make a chart with basic poses for the class as well as show us how to a model through those poses. We get to take the handout with us!
The workshop still includes some shooting, so I will definitely be bringing by Canon 5D. For just $25 per person, Bill's workshops just can't be beat. So far I've attended a high key and a low key lighting meetup. I will be posting some low key images later. If you haven't discovered Bill's offerings yet, I highly recommend you do so now by joining the Meetup group. The workshop classes are small for more individualized learning, and I've already made some great new photography friends.
Labels:
Bill Murphy,
digital photography lighting basics workshops,
meetup,
posing models,
working with models
An Aside: Snowmobiling with a professional photographer
Image by Steven Willis Photography
During my National Brotherhood of Skier summit coverage in Winter Park this year, I carved out some free time to have some fun! I tried skiing for the first time. (Hated it, but I'm thinking I may do better if I take a private versus getting lost in a group class that's too large). I tried snowmobiling for the first time. I ROCKED IT! Can't tell you how much I loved it. Well, actually I can....since I did it TWICE!
I took a tour through Grand Adventurers. A tour guide teaches you how to operate the snowmobile, then leads you through a ride to the Continental Divide on trails through lovely scenery. Tours top out at nearly 12,000 feet with views of the entire Winter Park Ski area and the Fraser Valley. The second time I did the tour, I lucked out: turns out tour guide "Snowmobile Steve" was also professional photographer Steven Willis. All week, I had been seeing these fabulous photos showcasing the ski area, portraits taken in the mountains and other great winter experiences by Willis. I thought to myself how wonderful it would be to meet him.
Snowmobile Steve took several photos of me on my vehicle with my trusty Canon G9. But when he whipped out a professional grade Nikon and started shooting landscapes, all the pieces fell into place. I asked him what his name was, and he said, "Snowmobile Steve." "No! What's your real name? Is your last name Willis?" Yep, I was right! I felt honored to be having such a good experience with another photographer and I can't wait to purchase some of his tour shots. Here's a photo of Steve with the remnants of an old train track in the background:
It's so rare for me to actually get caught in front of the camera. So I was thrilled to have my photos taken by a professional during one of those rare moments when someone finally got to shoot me. Several of my friends say I look "hardcore Colorado" in these photos. I agree, and I hope this year will be the start of even more firsts that I really should have done ages ago: including camping, skydiving and white water rafting!
Labels:
An Aside,
grand adventures,
National Brotherhood of Skiers,
skiing,
snowmobiling,
snowmobiling steve
Saturday, March 13, 2010
Saturday Morning Cartoons
Here is my favorite "What the Duck" comic from this week. Rock on Aaron! "What the Duck" is an online comic strip created by Aaron Johnson. I just love how Aaron's wry sense of humor reflects the current state of the photography industry. But what really freaks me out sometimes when I read his strip is how much they reflect whatever situation I'm currently experiencing too...whether it's working with clients or desperately trying to stay on top of technology like Facebook or Twitter or a host of other things that all add up to being a professional photographer.
The genius of his strip is the way viewers can interact with Aaron and his comic character. Folks are welcome to link, post, copy/paste, or save the strips to their own sites, blogs, forums, newsletters, etc. Aaron also allows viewers to suggest titles for his individual strips, and post photos of their own plushy and stuffed W.T. Duck working or hanging out.
Labels:
Aaron Johnson,
comic strips,
comics,
online comic strip,
photography comics,
photography humor,
Saturday Morning Cartoons,
What the Duck
Friday, March 12, 2010
Breaking News: Print Packages Now Available!
Picture Your World Photography is now pleased to announce a new client offering: exclusive print packages available for order directly from your private gallery!
The user-friendly feature has been a long time in the making. And now, finally, after endless hours of hard work by SmugMug programmers, my clients get to enjoy the convenience of crafting their own multiple pose packages and having them directly delivered. Ordering is a snap when you have one price for a whole heap of goodies.
So far, I've created four primary packages geared to satisfy everyone from the budget-minded to the big spenders!
"The Perfect Package," featuring two 8x10s, four 5x7s, 2 sheets of wallets, six 3.5x5 and an 11x14 is great when you can't decide which poses you love the most. Cost: $150
"You're So Popular," featuring six sheets each of 8 die-cut wallets is great for graduation announcements or thank you cards. Cost: $50
"The Starter Pack," featuring two 8x10s, four 5x7s and a sheet of wallets will tied you over when you are watching your budget.
"The Waltons," is for those blessed with an extended family. There's enough big photos, regular sizes and wallets to satisfy everyone from grandparents to cousins. It features a dozen 4x6s, six 5x7s, six 8x10s, two 11x14, two 16x20s, one 20x30 and six sheets of wallets. Cost: $750
Package options will appear under your gallery's "Buy button." Once you select the package from your list, you'll be taken to an area to select multiple photos. Mix and match your favorites by clickin and dragging your chosen images into place. When each item in the package is matched to a photo, you can add the package to your shopping cart and check out. Packages make buying so simple! But if you have any problems, feel free to call me directly, and I will walk you through the process!
Don't forget to stack coupons and special promotional offers for even more savings. Join the studio's Facebook Fan Page today to qualify for discounts and giveaways.
Monday, March 8, 2010
Instructor's Tip: Where water meets land
I hope you enjoy this week's "Instructor's Tip" by one of my favorite instructors, award winning nature photographer Russ Burden. To learn more about how Russ captured the above image, join him on one of his photo tours. Visit Russ Burden Photography to get more information.
Photo by Russ Burden. Taken on hia Oregon and Northern Calif Tour 5/22 - 5/31: One opening left
Where Water Meets the Land
Where the water meets the land brings to mind picturesque beaches, sunsets over the sea, crashing surf, and other images synonymous with the ocean. But the literal take of these words should not force you to think of these limitations. Land and water mesh around a lake, rivers carve terra firma, ponds, swamps, estuaries and streams are all bordered by earth. Every one of these settings give photographers plenty with which to work to produce great images.
Time of day is important with regards to what you want to capture. If dramatic warm light is the goal, then you’ll want to be out at sunrise or sunset. With the sun low to the horizon, colors are warm as the sun penetrates the particulates that hover near this point.
As gorgeous as the grand scenic can be, don’t overlook the details as the light or wave action changes. Glints of light from the setting or rising sun reflecting off the water have the potential to make great abstracts. If there is foreground detail, include it to make the glint wrap around a point of interest. Sand pattern images made in warm light are very powerful. Look for curving or leading lines. Even better if they lead out to the point where the water and land marry.
The image that accompanies this article was made while on my photo tour to the Oregon coast. I’d love to have you join me on this tour for an adventure of a lifetime.
Take a class with Russ or a fellow Digital Photo Academy instructor in your area, check out the Digital Photo Academy. I took Russ' intermediate and advanced courses last year, and he continues to be a strong source of knowledge and encouragement as I progress in my photography.
Check out Burden's "How To Tips" featured on Outdoor Photographer's website. The seven that are dated February 4th are his. Just underneath the articles, be sure to click on page 1 to see an additional 9.
Don't forget to check Take Great Pictures for Burden's most recent tips. On the home page, click on the "Photo Tips And Techniques" button in the left hand column. Additionally, check out his "Digital Tip of the Month" found by clicking on the Digital Photography button.
To learn more about this subject, join Burden on one of his photo tours.
Labels:
Digital Photo Academy,
digital photography tips and techniques,
Instructor's Tip,
Outdoor Photographer,
photo tours,
photography tours,
Russ Burden,
Take Great Pictures,
techniques tips
Thursday, March 4, 2010
Get the Job Done: Covering the National Brotherhood of Skiers Summit for third year in a row!
WINTER PARK -- I'm happy to share that Picture Your World Photography was hired to cover the National Brotherhood of Skiers 2010 Annual Meeting & Challenge Cup Mini Ski Summit in Winter Park!
This is the third consecutive year the studio won the contract for coverage of this event, and I'm blogging live from the media room at Winter Park Resort. With 69 clubs throughout the United States and United Kingdom, NBS members gather to raise funds for the NBS Olympic Scholarship Fund and recognize two-time Paralympian Ralph Green and former NBS Ski Team and Olympian Errol Kerr.
I started my coverage Tuesday night when I shot an exclusive Comedy Show with Cocoa Brown
Wednesday I shot the annual "Picnic on a Hill" luncheon which is basically a snow party right at the base of a ski slope! Several of the key NBS members were interviewed for a local radio and television stations, so I shot photos during the interview. I also got to take shots of members skiing down the mountain as well as others dancing and enjoying the luncheon. Lots of fun, for sure!
Here are some of my favorite photos from last year's event held in Aspen/Snowmass:
Picnic on the Hill 2009
It always fills me with pride when I run into people who remember me as the official photographer from last year. It makes me feel as though I'm definitely part of the team. Today, I will be covering the Challenge Cup races and tomorrow night, a pajama themed party. I've been driving back and forth from Denver to Winter Park to save money on housing since the drive is only about 90 minutes. I want to use the savings so I can do something I've been vowing to do since NBS members have been on my case about it: I'm going to take my first ever ski lesson! But I won't do it until all of my shooting duties are done on Saturday, you know, just in case I fall and hurt something and can no longer shoot the event!
Here's what I can expect from today's Challenge Cup Races:
Monday, March 1, 2010
Instructor's Tip: Achieving balance in composition
I hope you enjoy this week's "Instructor's Tip" by one of my favorite instructors, award winning nature photographer Russ Burden. To learn more about how Russ captured the above image, join him on one of his photo tours. Visit Russ Burden Photography to get more information.
Photo by Russ Burden
WEIGHTED TO THE LEFT
Photo by Russ Burden
BALANCED
BALANCE
My doctor tells me to eat a balanced diet. I do this to stay healthy - a good thing. Tightrope walkers depend on balance to make a living and stay alive - a very good thing. Photographically, I encourage you to achieve compositional balance before you press the shutter - a fabulous thing!
Balance in composition is important to make the image successful. If a photo is weighted too heavily on the top, bottom, left, or right, the viewer’s eye will fixate on that one area of the scene and have difficulty going to the others. The problem with this is the part where the viewer’s eye is not attracted is still part of the image making that section unimportant. This becomes wasted picture space yielding a picture that is not successful.
To achieve balance, key elements or focal points should be distributed within the image area. The balance may show symmetry from top to bottom or left to tight. Doing so makes for a more tranquil composition. If the balance is asymmetrical, one section of the image will appear heavier. The offsetting element in a different area of the image should be strong enough to draw the viewer to it. These images typically show more movement. Balance can be achieved using offsetting strong points of color, contrasting areas of light and shadow, size relationships, or other methods of including parts of the composition to draw the viewer to all parts of the image.
Take a class with Russ or a fellow Digital Photo Academy instructor in your area, check out the Digital Photo Academy. I took Russ' intermediate and advanced courses last year, and he continues to be a strong source of knowledge and encouragement as I progress in my photography.
Check out Burden's "How To Tips" featured on Outdoor Photographer's website. The seven that are dated February 4th are his. Just underneath the articles, be sure to click on page 1 to see an additional 9.
Don't forget to check Take Great Pictures for Burden's most recent tips. On the home page, click on the "Photo Tips And Techniques" button in the left hand column. Additionally, check out his "Digital Tip of the Month" found by clicking on the Digital Photography button.
To learn more about this subject, join Burden on one of his photo tours.
Photo by Russ Burden
WEIGHTED TO THE LEFT
Photo by Russ Burden
BALANCED
BALANCE
My doctor tells me to eat a balanced diet. I do this to stay healthy - a good thing. Tightrope walkers depend on balance to make a living and stay alive - a very good thing. Photographically, I encourage you to achieve compositional balance before you press the shutter - a fabulous thing!
Balance in composition is important to make the image successful. If a photo is weighted too heavily on the top, bottom, left, or right, the viewer’s eye will fixate on that one area of the scene and have difficulty going to the others. The problem with this is the part where the viewer’s eye is not attracted is still part of the image making that section unimportant. This becomes wasted picture space yielding a picture that is not successful.
To achieve balance, key elements or focal points should be distributed within the image area. The balance may show symmetry from top to bottom or left to tight. Doing so makes for a more tranquil composition. If the balance is asymmetrical, one section of the image will appear heavier. The offsetting element in a different area of the image should be strong enough to draw the viewer to it. These images typically show more movement. Balance can be achieved using offsetting strong points of color, contrasting areas of light and shadow, size relationships, or other methods of including parts of the composition to draw the viewer to all parts of the image.
Take a class with Russ or a fellow Digital Photo Academy instructor in your area, check out the Digital Photo Academy. I took Russ' intermediate and advanced courses last year, and he continues to be a strong source of knowledge and encouragement as I progress in my photography.
Check out Burden's "How To Tips" featured on Outdoor Photographer's website. The seven that are dated February 4th are his. Just underneath the articles, be sure to click on page 1 to see an additional 9.
Don't forget to check Take Great Pictures for Burden's most recent tips. On the home page, click on the "Photo Tips And Techniques" button in the left hand column. Additionally, check out his "Digital Tip of the Month" found by clicking on the Digital Photography button.
To learn more about this subject, join Burden on one of his photo tours.
Labels:
Digital Photo Academy,
digital photography tips and techniques,
Instructor's Tip,
Outdoor Photographer,
photo tours,
photography tours,
Russ Burden,
Take Great Pictures,
techniques tips
Subscribe to:
Posts (Atom)