
My friend and photo colleague Tiffany Trott was right on the mark in her blog post today at 23photos.com when she suggested that photographers reset their camera settings before putting away their equipment.
I made the terrible mistake of not checking my settings during a shoot at the Democratic National Convention. The night before, I had been inside a dark museum, requiring me to boost my ISO to the highest setting possible on my Canon 5D, which was an amazing 3600! My shots were perfect from that night, but I forgot to change those settings the very next day when I was shooting in broad daylight in front of Mezcal when celebrities associated with the Creative Coalition made another appearance.
I didn't realize my mistake until I uploaded the photos for post processing. As you can image, the increased ISO made the photos incredibly grainy and the color noise was out of this world, peppering darker African-American skin tones with speckles of blue, green and red. I was so sick to my stomach, I thought I was going to vomit! Some noise correction in Photoshop took care of most of it, but some of the shots just couldn't be saved.
From this point on, I would advise all of us to take Tiffany's advice. Don't store your gear away without resetting to your basic shooting mode. For me that's ISO 100 and turning the dial back to Manual or Aperture Priority. It's a great routine to have and include in your overall work flow.
Sunday, August 31, 2008
Get the Job Done: Gloria's Senior Portraits
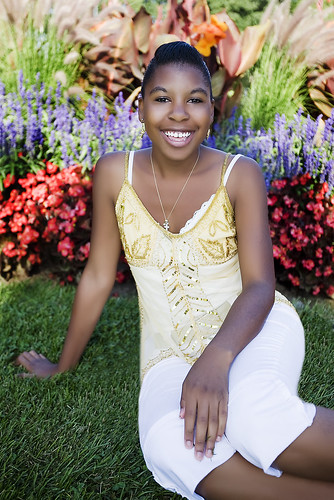
This Saturday, I did another senior portrait session with Gloria, a childhood friend and referral from Jordan. After finishing these great shots with Gloria, I'm more convinced now than ever that portraiture is the type of photography I love and prefer doing.
I like being able to show the client a new side of themselves, and I like having them experience a one-on-one session where they are the main focus. That makes the experience more personal and memorable if I can make them feel special and important. If a client is nervous, I will take the time to show them some of my favorite shots right in camera. The clincher happens when you hear that quick intake of breath or that gasp right before they say, "Wow, those do look good." I'm not sure if they are surprised by how they look or my ability to get the shot! :) Either way, those are always great reactions to witness.
A colleague told me once that a fellow photographer took portraits rather than some other type of photography, namely nudes or boudoir shots, because portraiture "was safe." But I don't think so. Maybe the photographer takes portraits because he enjoys being able to make people feel good about themselves, like I do. Lord knows we all have those moments when we need someone to remind us just how beautiful we really are.
Gloria said she wanted flowers in her senior portrait, so we spent the early morning at City Park where the flower beds are gorgeous, colorful and plentiful. I'm happy that Gloria's sister was with us; she not only was a great assistant holding reflectors and diffusers, but she was instrumental in getting true smiles and laughter from Gloria.
Thursday, August 28, 2008

DNC Coverage: WARNING DISTURBING IMAGE

After I finished writing my daily for the DNC coverage yesterday, I left the office and wandered around downtown Denver to see what I might come across. I happened upon this very intense protest against abortion and couldn't resist a chance to capture such raw human emotions and confrontation.
While several police officers flanked the perimeter of this scene, keeping a close eye on things, a large group of people crowded around this disturbing display of photos of allegedly aborted fetuses. I say "allegedly" because I've covered numerous abortion protests where I later discovered that the photos they were showcasing were not actually of human fetuses. I do not know about the legitimacy of these images; I only know that the response they drew from passersby was real.
To capture this shot, I used my 16-35 wide angle lens and placed myself directly between the protesters and crowd. While the poster itself is indeed very disturbing, I find my eyes moving around the image and focusing on each of the faces. Notice how the man in the right portion of the frame is lost in thought, biting his fingers. The woman with her hand on her hips is clearly arguing with the protester who is trying to argue her point of view. The other young protester isn't speaking, but his gaze is directly pointed at the woman confronting the protesters and their display. The young man in the yellow t-shirt directly across from me is caught in the middle, just like I am, but his gaze is on the woman as well.
One could argue that the image is too busy...that there is too much going on in the image for a viewer to be able to focus on. I say this is a pretty good example of photojournalism, capturing a moment filled with life and humanity. What do you think?
Wednesday, August 27, 2008
Get the Job Done: The Ultimate Client Compliment

My Favorite Shot from My First Senior Portrait Session
I received the ultimate client compliment on Saturday when I presented my first set of senior portrait shots to Jordan: "I want to be up on your wall!"
That's what Jordan said after I showed her what I think is one of the best portrait sessions I have taken to date due to the diversity of shots and locales. To Jordan, having one of her pictures blown up to a poster size and placed on one of the display walls in my home has become one of her goals. Since I have become her family's official photographer, I have images of her mother Teri, her brother Bishop and her baby sis Avery hanging up as a reminder to myself about my own growth as a professional photographer. So I've decided that I will honor her request and hang my favorite picture from the shoot, shown above. I love how the red of her shirt pops with the golden yellow background. Taking the shot from above is a complimentary angle for her features, while the vignetting adds a sense of timelessness to the image.
What shot did Jordan pick to go into her high school yearbook? This gorgeous pic taken of her on top of the 10th floor balcony of the Denver Newspaper Agency building where both her mother and I work for the Denver Post.

Jordan's Yearbook Pic
I could barely contain my excitement while she sorted through the images, and the fact that she had a hard time deciding meant there were tons of great pictures to choose from! I let her take control of my MacBook Pro as she sorted them out, and I think that personal touch really made her feel as if she was an integral part of this process (which of course she WAS!) It was difficult to try to take a back seat and let the client decide what photos she wanted because I definitely had my favorites, and I was surprised that she didn't like the same images I did, or even the same images her mother liked.
Overall, this was a great learning experience, and her referrals got me two more potential customers, one of which I will be shooting this weekend after the Democratic National Convention is laid to rest.
One other note: since I only had several hundred of images to edit, I went ahead and edited all the images before presenting them to Jordan. But what I found interesting is that out of the 50 I shot, she only picked about 20 that were her favs. Does that mean I spent unnecessary time editing shots she didn't want? I will have to chew on this a little more.
Tuesday, August 26, 2008
DNC Coverage: Celebrity Appearances in Denver

Trying to capture this image of Spike Lee was difficult because I am so dang short! So I had to hoist my camera above the fray and pray I got the right angle. A little straightening in Photoshop CS3 and this image was totally successful. Maybe next time I'm at a "red carpet event" I will do what the photographer on the left did: stand on a step ladder during the interview!
What I found interesting about this experience (other than fighting being star struck while I was covering the event for The Denver Post!) was Lee's refusal to deal with the media onslaught. He was angry that he got mobbed in front of Mezcal. Once he was rushed inside, he refused to come back out again. But other stars appearing at the same event willing gave numerous interviews and plenty of time in front of the camera.
To see other celebrity photos, visit my Flickr page or check out celebrity galleries at denverpost.com.
Monday, August 25, 2008
Instructor's Tip: Frame Edges and Balance

Enjoy this week's "Instructor's Tip" by award winning nature photographer Russ Burden:
Frame Edges and Balance
One of the nice things about landscape photography is the same subject can often net different images with many variations. The most basic is capturing the scene both vertically and horizontally. If you are not in the habit of doing this, write yourself a reminder right now and place it in your camera bag. Another way to create a variation is to add a foreground element. Additionally, you can shoot the scene with both a wide and telephoto lens to get different perspectives. As most variations are based on compositional changes, there are two more ideas I want you to add to your shooting list - Balance and Frame Edges.
FRAME EDGES are very important and often overlooked as many photographers zero in on the key subject area that is usually toward the center of the frame. The concept of TUNNELING the viewfinder happens as ninety percent of the attention is given to what’s occurring in the center. I urge you to carefully scan every corner of the viewfinder.
BALANCE - Prevent a situation where too much of the composition is weighted to either side or to the top or bottom portion of the image. The most common OOPS regarding this is including too much sky, especially if it lacks drama.
The photo(s) in this post were taken by Russ Burden. To learn more about how Russ captured this image, join him on one of his photo tours. Visit Russ Burden Photography to get more information.
To take a class with Russ or a fellow Digital Photo Academy instructor in your area, check out the Digital Photo Academy. I took Russ' intermediate and advanced courses last year, and he continues to be a strong source of knowledge and encouragement as I progress in my photography.
Don't forget to check Take Great Pictures for Russ' most recent tips. On the home page, click on the "Photo Tips And Techniques" button in the left hand column. Additionally, check out his "Digital Tip of the Month" found by clicking on the Digital Photography button.
VOTE NOW: August Monthly Photo Assignment - Rural Architecture
Vote for your favorite interpretation of the monthly assignment topic: "Rural Architecture." Polls will be open from now until next Monday with the next month's subject announced at the same time. The winner of this assignment picks next month's topic.
Feel free to leave your comments about why you voted for a certain picture here. These assignments are designed to stretch our imagination, challenge our interpretation of topics and start shooting on a regular basis. Constructive criticism only helps us all get better at the craft we share and love.
Feel free to leave your comments about why you voted for a certain picture here. These assignments are designed to stretch our imagination, challenge our interpretation of topics and start shooting on a regular basis. Constructive criticism only helps us all get better at the craft we share and love.
Sunday, August 24, 2008
DNC Coverage: The American Presidential Experience
On Friday, I covered my first Democratic National Convention event -- "The American Presidential Experience" traveling exhibit running at Invesco Field at Mile High. The exhibit was an opportunity for Colorado residents to indulge in some nonpartisan fun before the Dems took over Denver.

I took the above picture of Josh Widoff teaching his daughter Molly, 7, how to cast a vote at an interactive station in the exhibit. I like the intimacy of the image showcasing this father-daughter relationship as well as capturing a "teaching moment" where Widoff said he wanted Molly to be a part of a decision-making process where her thoughts and ideas counted.

Following a brief ribbon cutting ceremony hosted by Denver Mayor John Hickenlooper and other dignitaries, the local media got a first peek into the exhibit before it opened to the public. Special features included one of the 25 original copies of the Declaration of Independence, a full-size replica of an Air Force One fuselage used by Kerry Edwards, and an Oval Office circa Ronald Reagan, rare political memorabilia and fun peeks inside the lives of the nation's most influential leader.


It was more difficult than I thought trying to do the double duty part of writing notes and interviewing people while trying to get their picture for the paper at the same time. Today will be even more difficult as I troll around downtown with two cameras on me, one with a 70-200 2.8 fitted lense and the other with a 16-35 2.8, so I can quickly move from a wide angle to the zoom without any interruptions.
Here are some shots of Denver Councilman Michael Hancock purchasing some Barack Obama buttons.


Saturday, August 23, 2008
Get the Job Done: Presenting Senior Portraits

I will be meeting with Jordan in about 30 minutes to present the images from her senior portrait shoot. I'm extremely pleased with how this session turned out! During post processing, Jordan's mother requested that I edit out Jordan's piercings near her right eye. I followed those instructions, but I left this one image with the piercings just for Jordan because I believe they are a part of who she is right now in the course of her life. And what more is photography but a moment captured in the life of a subject? Congratulations Jordan!
Throughout the week, I've been posting up my favorite pics to my Flickr page where Jordan has been able to take a peak at my editing process. I did this to create a sense of excitement and adventure for this young woman, almost like unveiling a Christmas gift before the actual holiday. She was able to share the images with her friends and helped me land two more senior portrait sessions.
I didn't post up everything because I wanted Jordan to be surprised by some of the images. Today she will be picking out which photo she actually turns in to her high school yearbook department, as well as orders for additional images and the ones she wants to have printed as part of her session package. She gets to choose from two 8X10s or four 5X7. Because she gave me two referrals, Jordan gets to order extra prints for free or take $50 off her portrait session cost. She has also purchased a CD of all of 50 edited images re sized to only print 4X6s.
ON DEADLINE: Turn in August Photo Assignment By Tomorrow
Hey everybody, you've got until tomorrow evening to turn in your images for this month's photo assignment: RURAL ARCHITECTURE.
Email me your photos no larger than 5 MB at shebawheeler@picture-yourworld.com with a link to your business website, flickr page, online galleries, etc.
Email me your photos no larger than 5 MB at shebawheeler@picture-yourworld.com with a link to your business website, flickr page, online galleries, etc.
Saturday Morning Cartoons

The popular online comic strip is celebrating it's 2nd year anniversary. Congratulations Aaron! And thank you for encouraging me and others to seek comfort in our sense of humor when the ebbs and flows of the photography business threaten to overwhelm us. Beginning on Sept. 8, the comic will relaunch as "W.T. Duck."
Thursday, August 21, 2008
Breaking News: Covering the Democratic National Convention

The Democratic National Convention is converging on Denver this coming week, and I've just been given my press creditentials to cover the event as both a print and photojournalist! The features and entertainment editors at the Denver Post said I have been given free range to keep my camera on me and shoot whenever possible in addition to my normal written assignments. We are so short staffed that everyone is pulling together doing double and even triple duty to cover this historic event.
I feel proud to know that my bosses at the newspaper support and encourage my freelance photography. They have seen me grow in my new craft over the last year and they know it's not some passing fancy, but a legitimate skillset that can make me a more well-rounded journalist. Look for shots I will be taking throughout the week here my blog!

If you are in the Denver area or will be traveling here to catch some of the action, use these photography tips from Illuminate Workshops executive director Efrain Cruz.
"The opportunity to make important, historical photographs is less than 48 hours away. If photojournalism is your forte or if you just want to go out and see what you can see, here are some tips for you to take great photos and stay out of trouble.
1) keep your ID (and photography business card) with you
2) be mindful of your camera gear and pocket-contents
3) travel light (a tripod may not be advisable)
4) be mindful of your surroundings
5) keep someone's phone number handy.
If the crowds and hoopla isn't your cup-of-tea, then perhaps heading into nature may suit you better. There are plenty of beautiful scenes in nature this month. Wildflowers are in full bloom, streams are flowing and the elk look majestic.
1) Make sure your batteries are charged
2) memory cards are ready to fill
3) bring suitable clothing for changing weather and temperature
4) for great photos, "get close", while maintaining a safe distance from wildlife. Read park literature for more information.
There's plenty to do this month. Whatever you chose to do, be prepared, be safe and bring your camera."
Life in the Fast Lane
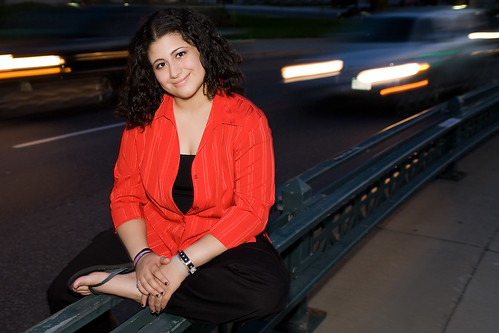
The senior photo shoot I just finished with my young client, Jordan, was a wonderful success and has given me a plethora of new images to proudly add to my portfolio. Jordan's willingness to try just about any crazy posing idea I threw at her made her a joy to work with, even when the idea itself might not have worked. When I told her about this wacky idea to showcasing her with the world blurred and moving at a fast past around her, she thought it was cool and was up for it.
To make this work, Jordan sat on a median in the middle of a busy downtown Denver street. The space wasn't big enough for me to sit with her and still use my tripod, so I had to handhold this night shot. Many times, my own motion blur ruined the shot, but thankfully just a pop of flash from my 580 EXII was more than enough power to freeze her while still maintaining the movement of traffic behind her in this one. Both Jordan and I could tell that her mother was beginning to get worried about us being near so much busy traffic, so I rattled off as many shots as I could, and we headed back to the sidewalk.
I think this makes for a very unconventional senior portrait shoot, and it will be something Jordan has that very few if any classmates will have duplicated. It's also a good lesson to share with photographers who are shooting senior portraits. Of course you've got to get that traditional shot that the student will turn in to her yearbook staff. But remember that the session is also about having the opportunity to showcase who that student is in his or her life right now.
Wednesday, August 20, 2008
There's a Rainbow in the Sky All the Time
This post originally appeared in my bi-weekly entries to One Day One Picture.
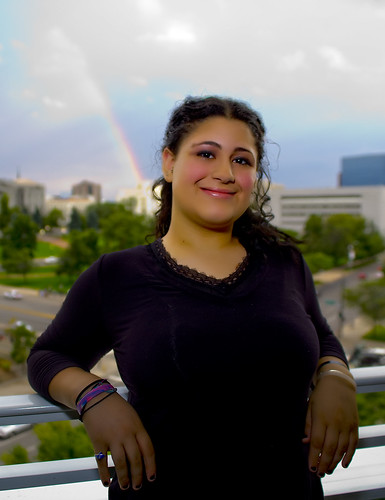
Always be aware of your surroundings. A momentary drizzle forced my senior portrait shoot with Jordan inside to wait out the rain. But I would have missed this incredible opportunity to photography Jordan with the rainbow in the background if her little sister, Donovan, hadn't grabbed my arm and dragged me to the window.
"Look! A rainbow!" I wasn't sure if I would be able to capture this natural phenomenon before it disappeared. So I rushed Jordan to a balcony and started shooting.
To get this shot, I had to meter for the sky and rainbow, which left Jordan underexposed. To compensate, I used a bit of fill flash to lit up her face and body, but she was still more shadowed than I wanted. So in CS3, I used a quick mask to select Jordan's face and a Curve to adjust the lighting in just that area. I think it works because I still want Jordan to be the main focus of the image, but the rainbow in the background gives the image depth.
This picture has become very popular and Jordan's referrals have helped me secure senior portrait sessions with two extra seniors. With a deadline of Sept. 19 to get their photos into their school, I've really got to get a move on it!
Breaking News: Pop Photography's Annual Readers Contest

Don't miss your chance to enter!
Deadline: September 12, 2008
The 15th Annual Popular Photography Photo Contest gives photographers the opportunity to have their work recognized in the January 2009 issue of Popular Photography, the largest photo magazine in the world, as well as on PopPhoto.com. The winning photographers will also win prizes from Panasonic, Tourism Ireland, Circuit City, SmugMug and fotocommunity.com.
Categories include:
+ Grand Prize Winner +
The Grand Prize winner will receive a 50" Panasonic HDTV, HD Camcorder, Blu-Ray DVD Player, Lumix Digital Camera, and an all expense paid trip to Ireland for two. The Panasonic Prize package will be set up or installed by firedog, Circuit City's highly trained professionals. The winner will also receive a SmugMug Lifetime Pro account with full customization, $500 of free prints/gifts from the SmugMug website, entry to exclusive 2009 SmugMug Workshop, a 3 year world membership from fotocommunity.com, as well as a X-Rite ColorMunki Photo

+ Category Winner +
The winners of each category will receive a new Panasonic Lumix Digital Camera, a SmugMug Liftetime free Pro Account, as well as a 2 year world membership from fotocommunity.com.

Wow...a lifetime free pro account is amazing, considering one year costs $150. The contest is worth entering just to get your hands on that! Good luck everyone.
Monday, August 18, 2008
Instructor's Tip: Work the Scenic

Enjoy this week's "Instructor's Tip" by award winning nature photographer Russ Burden:
Scenic photography can be very rewarding. Returning home from a photo trip with a few winners is always a feel good. Whether the images are destined for the wall, potential stock shots for an agency, contest entries, or simply remembrances of your experiences, every time you look at the image, you’ll feel proud. Sometimes a great scenic will unfold because the light is special. Other times the light will be flat and you’ll walk away from the day’s shoot with nothing. Regardless of the weather, an important part of getting the most out of the situation is to learn to fully work the shoot. This means exhausting as many possibilities as possible to make sure you cover all bases.
Come with me on a photo tour and you’ll hear me share the following:
DON'T LET YOUR TRIPOD TAKE ROOT: Just because you find a good angle, don’t plant your tripod in the same location and leave it there. A voice will be telling you - DON'T GIVE UP: Overcast and cloudy weather can be disheartening so rather than lament, shoot subjects that are appropriate for the conditions. You’ll hear me say - FILTER IT: Use that polarizer and graduated neutral density.
These are just a few of the ways one can work a scenic. There are many more. I’d love to share them with you."
-Russ
The photo(s) in this post were taken by Russ Burden. To learn more about how Russ captured this image, join him on one of his photo tours. Visit Russ Burden Photography to get more information.
To take a class with Russ or a fellow Digital Photo Academy instructor in your area, check out the Digital Photo Academy. I took Russ' intermediate and advanced courses last year, and he continues to be a strong source of knowledge and encouragement as I progress in my photography.
Don't forget to check Take Great Pictures for Russ' most recent tips. On the home page, click on the "Photo Tips And Techniques" button in the left hand column. Additionally, check out his "Digital Tip of the Month" found by clicking on the Digital Photography button.
Sunday, August 17, 2008
Growing Pains: A Client Stood Me Up!
I woke up pretty frustrated this morning after a client stood me up yesterday. In more than a year of shooting professionally, I have never had this happen before. I was too trusting. Now, I think I have to institute some new policies to try to prevent this from occurring again: every client must pay a non-refundable reservation fee.
So here is what happened: I was scheduled last Sunday to shoot a senior portrait session with this client. But earlier in the week, the client asked for a rescheduled session because of a conflict with a doctor's appointment. The new session was scheduled for yesterday evening, but I was getting anxious about it. All week long, emails and phone calls I had sent to confirm the shoot were ignored. I finally got a return phone call on Friday saying everything was ago.
The 5 p.m. appointment time came and went, with no word from my client who apparently just lives a few blocks from me. Finally at a quarter to 6, I get a cell phone call from the young client saying she knew she was late and that she was sorry and aware of how disrespectful it was. And could we reschedule for the next day? The call broke up, but I made out that something she was doing took longer than she expected, but I could make the rest out.
I emailed the client saying that I was booked today, and that we could reschedule again, but she would be required to pay for her entire session upfront before any shooting began. I didn't hear from her, but her mother emailed me back within minutes saying she was sorry about the missed appointment and that her daughter was looking forward to getting her pictures taken. I responded repeating my initial statement about the session being paid upfront in order for the session to be rescheduled. But neither she or her daughter responded.
I blame myself for this mishap because I should have stuck to my guns and required the retainer fee. Because this client was a referral, I thought she could be trusted and I relaxed my rules, agreeing that she could pay half when she came to the session. Not only does doing so protect my time, but it's a greater incentive for a client to show up for something they have already paid for, especially if it's clearly written in the contract that they can't get that money back if they cancel.
Further reading about this topic online revealed some controversy about whether a "deposit" is legally nonrefundable, as well as a "retainer." The argument is that it's not since a deposit is a payment toward goods and if no goods are delivered, the deposit must be refunded. Photography legal eagles say it's better to use the word "reservation fee," because this is a payment toward services, and if it states in a contract that the reservation fee is not returnable, this can be upheld even if no goods are delivered.
PhotoAttorney.com explained in a blog why you should not use the word retainer for the deposit unless it is refundable, and include a provision in your contract such as: If Client fails to perform, liquidated damages shall be charged in the reasonable amount of $____.
Seek professional advice from a lawyer to find out what wording holds up in your state courts. And be clear about your charges, services and expectations, to avoid these type of client disputes.
Saturday, August 16, 2008
Saturday Morning Cartoons

Enjoy today's installment of Aaron Johnson's photocentric comic strip "What the Duck."
The popular comic is celebrating it's 2nd year anniversary. Congratulations Aaron! And thank you for encouraging me and others to seek comfort in our sense of humor when the ebbs and flows of the photography business threatens to overwhelm us. Beginning on Sept. 8, the comic will relaunch as "W.T. Duck."
Get the Job Done: Rain Forces Senior Portrait Shoot Inside
It is raining like cats and dogs today, which would otherwise be wonderful for an extremely dry and arid state like Colorado. But I'm bummed that the rain will force my senior portrait shoot with Nina inside. Maybe by the time we start this evening, it will have cleared up. But if not, I will just have to work my magic in my homemade studio.
When I asked Nina what kind of shots she was interested in, she emailed me these fun shots of Marilyn Monroe and asked if we could duplicate something like those:


When I asked Nina what kind of shots she was interested in, she emailed me these fun shots of Marilyn Monroe and asked if we could duplicate something like those:


Friday, August 15, 2008
This Weekend: Editing Senior Portraits, Shooting Another Senior Portrait

This weekend, I will be editing photos I took during Jordan's senior portrait session in downtown Denver last Saturday evening. I am also schedule to take senior pics of Jordan's buddy, Nina, this Saturday, so wish me luck. Jordan's session was very fun. She was open to try just about anything I could throw at her during the shoot. Shooting in the early evening right before sunset and into the night was the perfect time and I couldn't have asked for more wonderful, even lighting! Felisa did a fanstatic job with Jordan's makeup. And it was wonderful to hear her growing excitement about her senior year. The photo session made her feel special, and she said "This year really is about me, isn't it?" It certainly is, and I wish you all the fun and happiness in the world, Jordan! Congratulations.

I will be trying a new editing process with Jordan's photos, and I'm a little uneasy about it, so I thought I would share it here and get some advice. Last night, I took a business management course hosted by Illuminate Workshops. Wedding Photographer Jim Turley was the instructor. This is the second time I took the class because I really wanted to make sure I understood and retained the information since I know how important it is to have a good solid business foundation.
Some information Jim shared with the class last night made me fear that I had been really messing things up concerning my time management in my editing process. Jim said that he only does an initial edit of images for lighting adjustments, sharpening and noise. Then he shows proofs to the client. The client picks out the images they want in their album, and Jim then edits only those images.
Seem as if I've been doing everything backwards! I usually edit ALL of my images before I let the client see them. It makes me feel uneasy showing clients a basically RAW, unfinished product because part of my skill set (and consequently what I'm selling) is my Photoshop skills. The client can't visualize what the image will look like after I'm done crafting it to my particular style.
But Jim explained that it was wasting my time on images the client might never want. Plus, a turn around time of two weeks might be too long for the client who wants to see their images now, whether they have or haven't been edited. Other colleagues say they notice their sales drop off significantly if clients don't get to see images within a few days. My hope is that since I have photographed Jordan's family many times now, they will feel comfortable letting me try this new procedural change with her.
What has been your experience with this and what would you recommend I do?
Wednesday, August 13, 2008
What Say You?: Creating a Business Logo
For the past few months, I've been trying to create a business logo for Picture Your World Photography. I've been struggling trying to find a way to quickly and easily show a full-service photography company. It's the reason why I chose the name "Picture Your World" instead of "Sheba Wheeler Photography" to create an all-encompassing brand that might one day feature more than digital photography, but include an entire roster of numerous photographers all shooting under my leadership. What can I say, I dream BIG!
While looking through the All Things Photography website, I was inspired by Nick Stubb's logo which features a picture viewing inside a camera's focus screen with the letters ATP written inside. That got me to thinking about a similar idea for my own logo. Since I shoot with a Canon 5D, I found a picture online displaying the back of the camera model. Then I just typed in the company name into the LCD screen. Now, I need your advice. What do you think about this as my logo? Please leave a comment. I'm not completely sold on the typeface yet, but I couldn't decide if I wanted to go oldschool Times New Roman or do some decorative script like I now have. What Say You?
If you think you can do better (and I KNOW you can because I am not graphically-designed oriented) how would you like to trade a photo session for a business logo?

Get the Goods: Discount for Wedding Photography Blueprint

There are only FIVE DAYS left to get a 33 percent discount on the newly released,"Wedding Photography Blueprint," dubbed as the most in-depth digital wedding photography foundation course on the web. The course, created by "All Things Photography" is designed to give anyone the chance to become a successful wedding photographer, regardless of experience or knowledge. These extensive and easy to understand DVD's and eBook make your learning curve as easy as "painting by numbers".
Written, filmed and edited by professional wedding photographers with over 25 years experience, these tutorials have been designed as a type of home study course. You can study at your own pace and learn how to shoot, edit and present award winning images for your portfolio or to your clients.
The cost is £147 ($295). However, if you grab a copy in the first week of release, you will get this entire set for £97! ($195).
The course includes four DVDs and loads of bonus material including:
99 Page eBook on the entire Wedding Photography Blueprint - Includes information not covered in the DVD's
Free Copy of 97 Page PDF eBook on Getting Started in Property Photography
Free Copy of 111 Page PDF eBook on Advanced Photography Tips
Free Copy of 19 Page PDF eBook on an Introduction to the DSLR
45 Minute Interview with a Successful International Wedding Photographer
30 Minute Interview with a Successful Wedding, Portrait and Commercial Photographer
Short Interview with Wedding Couple Discussing Their Needs When Looking for a Wedding Photographer
MP4 iPod Files of DVD's 1, 2 and 3
3 Extra Photoshop Tutorials
Plays on Computer Only
Tuesday, August 12, 2008
Get Out There: I Need a Second Shooter for a Wedding Reception

I am shooting a wedding reception for a friend, and I'm wondering if I could get a second shooter looking to work for free and have images to put in his/her port. My client is giving the photos to the bride and groom as a gift. The couple had a simple ceremony before a judge and decided to splurge on their reception.
One way for you to make money is this: I would like the second photographer to set up a "photo booth" which actually is just an area with a background/backdrop to take portraits. That way, if anyone wants portraits, you can take the profit from those sales. I will be shooting the actual reception. You up for this? Email me at shebawheeler@picture-yourworld.com
The reception is Sept. 13 in Denver! It's your chance to "Get Out There!" Let me know ASAP
An Aside: Can't Get Enough of Me? I'm Writing For Two Other Blogs!
If you aren't sick of me yet, then you might be interested in checking out what I have to say in another blog I have been writing for since last year called One Day, One Picture. Since my own blog is so heavily narrative driven, I really like the ODOP format that concentrates on one or two photos in a single post. Since my colleagues Tiffany Trott and Chester Bullock both seem to focus on book reviews and other general photography topics, most of my posts deal with "How Tos" explaining how to master cool shooting techniques. I'm far from being a pro at these kinds of shots, but I'm learning, and whatever I have the opportunity to learn I will gladly share with you.
If you can't get enough of me, head over to ODOP and see what I have to offer in smaller, consistent bites. :)
Plus, since I cover home and interior design at The Denver Post, be sure to check out The HomeGirls blog I and my editor, Elana Ashanti Jefferson, maintain about our features beat coverage.
Get the Job Done: Colorado Dragon Boat Festival Pics Finished!

Today, I uploaded the edited versions of my Colorado Dragon Boat Festival coverage for event photo coordinator Kit Williams. I fulfilled Kit's request for me to concentrate on storytelling shots featuring the sponsor booths and families enjoying quality time together at the annual event. See my gallery of images here.

Overall I am pleased with my coverage. This was the first time I had ever shot an outdoor festival and the first time attending the Dragon Boat Festival. It was a great chance to have a more intimate peek in the state's vibrant Asian community. The photo above shows a woman holding both an American and Philippine flag, showcasing her dual heritage. It's one of my favorite images of the day.


Plus, I will never forget how sick I felt from heat exhaustion when my four hours of volunteer service were done. It was well over 100 degrees that day, with very few trees to hide under for shade. So I definite spent a lot of time with families trying to keep cool. Some of my favorite shots include the crowd hanging out in the Misting Station where sheets of moisture fell like soft rain an anyone huddled under the tent. Even dogs were brought to the Misting Station to get some creature comfort from the sweltering temperatures.


The above shot is my most favorite from the day. There is something about being able to capture this wonderful loving moment that is a part of my signature photographic style. And I like the action shot above too, with the guy in the lower right hand corner adding depth to the image as your eye moves across the frame. I was serving as a volunteer photographer from the Denver Darkroom, but there were plenty of opportunities for me to pass out business cards for future shoots. One of the festival moms emailed me today looking for a specific picture I took of her children. I am hoping my generosity of giving her one of five images I took of her youngsters for free will keep me in her mind's eye should she ever need a photographer again, plus she can order the other four shots from my website. And I'm still hoping the young mother I met who needs a photographer to shoot her daughter's quincenera will hire me!

Shooting the festival let me know I still have a lot of work to do in bettering my photography skills when shooting in broad daylight. Many of the photos were overexposed, even though I had my Gary Fong Cloud diffuser. Some of the overexposure just couldn't seem to be helped as nearly everything - people and events - were in direct sunlight, as seen in the shot above. I figured I would be battling this particular photographer's nightmare shooting situation, so I shot everything in RAW so I would have a better chance of rescuing overexposed images. The best shots were those where I captured people under the shade of trees or tents and used a touch of fill flash to light up shadowed areas.
Got any tips on shooting in direct sunlight? Please share with me! Until then, hopefully this link might help us both out if you have trouble shooting in this kind of situation too.
My friend and photography colleague Tiffany Trott of 2*3 Photos offered this "Sunny 16" rule:
here's a brief explanation of the "sunny 16" rule..it's geared mostly to film but you can apply it to digital if you're shooting in manual mode.. hope it's helpful...
In photography, the sunny 16 rule (or, less often, the "sunny f/16 rule") is a method to estimate correct daylight exposures without using a light meter.
The basic sunny 16 rule, applicable on a sunny day, is this:
Set aperture to f/16 and shutter speed (reciprocal seconds) to ISO film speed.
For example, for ISO 100 film, choose shutter speed of 1/100 second (or 1/125 second)
The elaborated form of the sunny 16 rule for more general situations is:
Set the shutter speed to the setting nearest to the ISO film speed
Set the f-number according to the table below:
Aperture Lighting Conditions Shadow Detail
f/16 Sunny Distinct
f/11 Slight Overcast Soft around edges
f/8 Overcast Barely visible
f/5.6 Heavy Overcast No shadows
f/4 Sunset
Monday, August 11, 2008
Instructor's Tip: Travel Shots - People

Enjoy this week's "Instuctor's Tip" by award winning nature photographer Russ Burden:
"Travel Shots - People
Getting hooked on travel photography is kind of like the chicken or egg debate. Which comes first - the desire to travel which leads you to record what you experience or were you already involved in photography which encouraged you to travel to get images of certain locations? For whatever the reason, the two go hand in hand.
A favorite subject of many photographers when they travel is people. Whether it’s a family member, travel companion, or the native people of the area, capturing a good image allows you to relive your experiences in a positive way. Many options await the eager travel photographer with regards to photographing people. Tightly cropped portraits, wide angle environmental shots, small or large groups, candids, posed formal shots, you get the idea. Use the following options to create diversity in the images you bring home to create a memorable album or slide show:
FILL THE FRAME with tight head shots.
GO WIDE to capture the people in their environment.
SHOW THE NATIVE PEOPLE your digital sensor so they can see the fruits of your labor.
PHOTOGRAPH PEOPLE IN GROUPS to add variety to your images."
-Russ
The photo(s) in this post were taken by Russ Burden. To learn more about how Russ captured this image, join him on one of his photo tours. Visit Russ Burden Photography to get more information.
To take a class with Russ or a fellow Digital Photo Academy instructor in your area, check out the Digital Photo Academy. I took Russ' intermediate and advanced courses last year, and he continues to be a strong source of knowledge and encouragement as I progress in my photography.
Don't forget to check Take Great Pictures for Russ' most recent tips. On the home page, click on the "Photo Tips And Techniques" button in the left hand column. Additionally, check out his "Digital Tip of the Month" found by clicking on the Digital Photography button.
Saturday, August 9, 2008
Saturday Morning Cartoons

Enjoy today's installment of Aaron Johnson's photocentric comic strip "What the Duck." The popular comic is celebrating it's 2nd year anniversary. Congratulations Aaron! And thank you for encouraging me and others to seek comfort in our sense of humor when the ebbs and flows of the photography business threatens to overwhelm us. Beginning in Sept. 8, the comic will relaunch as "W.T. Duck."
Q and A: Resizing, Printing and Aspect Ratio

QUESTION: Bill M on the Dgrin forum asks: "Just curious, on the disk that you give to clients, you mention 'sized to print 4x6'. Does that mean low-res copies or just uncropped copies? If low-res, what size have you changed them too? What prevents them from printing these images larger? The reason I ask, is I have yet to find a way to make this work. Even an image at 72 dpi with a 4x6 canvas size can still print a decent-looking 8x12 image."
ANSWER: The more I thought about it, the more Bill's question troubled me. I thought that by simply forcing the size of the image to a 4x6 format, it would prevent clients from printing larger images, but what if I was wrong?
I did some digging, and I discovered this video tutorial available on Nick Stubb's All Things Photography, a newsletter and website I subscribe too. Check it out and tell me what you think. I will try this technique to see if it works for our mutual needs of protecting our images.
------------------------------------------------------------------------------------------------------
QUESTION: THENIMIRRA (that's me!) asks: I've been having some difficulty dealing with aspect ratios since I bought my Canon 5D with it's full frame sensor. What does that mean and why do I end up having to crop everything to a 8x12?
ANSWER: Jeff Lawson from the Wolf Camera Store at 1802 S Havana St Aurora, CO 80012 Phone: (303) 696-9700 says:
Aspect ratio relates to the dimensions (height & width) of the film or image sensor on a digital camera and how that translates
to print sizes. For instance the dimension of the image sensor on a digital SLR is 2:3 or 2 pixels high by 3 pixels wide. When printing an image from a digital SLR that 2:3 dimension translates to a 4x6 inch print. The same aspect ration applies to 35mm film 2:3. So, with that in mind here are examples of print sizes that can be print "full
frame" with a digital SLR and a 35mm camera 4x6, 8x12, 16x24, 20x30
and 24x36.
Now, a point and shoot digital camera has a different aspect ratio, it is 3:4. It's a bit taller. This is why if you want a "full frame" print from a point & shoot you have to print a 4.5x6 inch print. I have customers come into my store constantly with point and shoot digital cameras wanting to know why the forehead of their kids are cut of on the 4x6 prints they made when they clearly see all of the forehead when they look at the image on their computer. When they printed the 4x6 the naturally lost 1/2 an inch from the image. Additional sizes for a P&S would be 6x8, 18x24 and 36x48.
Now here is where it gets interesting. I shoot with a digital SLR and my client wants an 8x10 print not a
full frame 8x12. 8x10 is a 4:5 aspect ration and my camera shoots at 2:3 aspect ratio. This means that when I shoot the image I have to leave myself some wiggle room in order to crop off the 2 inches I'm going to lose when I make my clients 8x10 print. the same principle applies when I'm printing an 11x14 or a 16x20.
The most common mistake people make when shooting images is framing the image to tight. They don't that little bit of "wiggle room" to allow for the natural crop that will occur when they enlarge the image to the more common sizes ie: 5x7, 8x10 and 16x20.
Friday, August 8, 2008
SPECIAL BACK-TO-SCHOOL SENIOR PORTRAIT DISCOUNT

School is back in session, and to celebrate the new year, Picture Your World Photography is offering a special discount throughout the month of August!
If you refer one person who books a photo session with me, I will give you a $25 package discount or free additional prints. I shoot in studio or on location. Book me today, as most senior portraits are due to the school by mid September and available dates are filling up fast! Contact me at shebawheeler@picture-yourworld.com.

This Weekend: Shooting a Senior Portrait Session
Sunday evening, I will be shooting my first senior portrait session with Jordan, and I'm very excited! I already have shooting locations in mind for my nontraditional look, including a cityscape from the 10th floor of the Denver Post building. A friend and new makeup artist, Felisa Cardova, has agreed to work for us for free since she is still building her portfolio. Here is a shot of Felisa while she is working with Jordan's mother, Teri. Here is an example of the great work Felisa did for Teri during our glamorous boudoir session.
Jordan also referred me to another senior, Nina, whom I will be shooting next Saturday. Most of my work has come directly from referrals, and both Jordan and Nina are looking for other students to book services with me because they get a great package discount for every referral they give. Jordan opted for more prints, while Nina wanted a discount on her overall package.
Jordan also referred me to another senior, Nina, whom I will be shooting next Saturday. Most of my work has come directly from referrals, and both Jordan and Nina are looking for other students to book services with me because they get a great package discount for every referral they give. Jordan opted for more prints, while Nina wanted a discount on her overall package.
Get the Job Done: New Wedding Packages Announced

It took me several days and lots of advice from my colleagues before I came up with a list of new wedding packages that I believe compensates me for the time and work that goes into comprehensive wedding coverage. I have included some contemporary add-ons that are in demand today, including DVD slideshows, custom coffee table photo memory photo books, and custom canvas paintings.
I started out with five different packages from $800 and up so my prices could fit into any budget. But I was quickly told by my colleagues that I had too many choices with very little difference in value. I changed it to three packages, offering high end, mid-range and standard service options that differ based on the amount of coverage time and add-ons included in the package.
Plus, my theory of likely having more clients who could pay at the $800 range (and fewer at the $5,000 range) was quickly shot down too. More quantities only meant more work for me at less pay, one colleague explained. Another colleague suggested it would be professionally more beneficial for me to work towards appealing to a higher end client in this Digital Grin Photography discussion forum thread. I would encourage you to read through this thread because I think it's filled with great advice from more seasoned wedding photographers.
Wednesday, August 6, 2008
Get the Goods: Portrait Software Giveaway at DIYPhotography.net

DIYPhotography.net is hosting a great photo contest with grand prize winners walking away with a coveted copy of the new Portrait Professional 8. I use the standalone version of Portrait Professional to help me quickly touch-up shots, and it's an invaluable tool to have in your post-processing workflow.
All photographers are encouraged to submit their favorite portraits of someone special in their life to win one of the three available copies of the software's latest update. And it's not your run-of-the-mill plug-in either... it's the studio high end version valued at $239.95!
So how do you get your hands on these? There are three ways to participate:
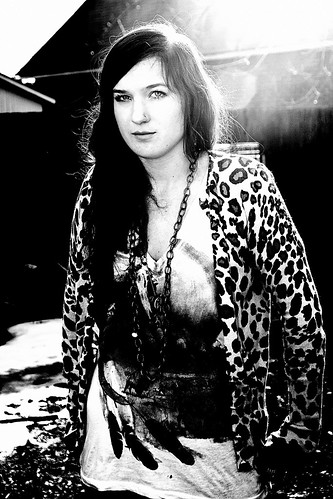
1. A Black and White Portrait
The first way to win a copy of Portrait Professional 8 is to submit a black and white portrait. The only two rules here are that the portrait must be in black and white and that it needs to be of someone meaningful to you.
This someone can be a family member, a close friend or any other person who has positive impact on your life. In the picture description, write why this person is meaningful for you.
You can submit a portrait to the contest by sending it to the DIYP Flickr group and tagging it with "DIYP" and "pp8giveaway".
2. A Color Portrait
The second way to win a copy is to submit a color portrait. The rules are similar: Post a portrait of someone meaningful in your life, be it your wife, husband, child, parent, friend. Anyone for whom you feel strongly. Post the portrait to DIYP's Flickr pool and tag it with "DIYP" and "pp8giveaway".
3. A Portrait Tip
The third way to win a copy is to submit a portrait tip. It can be a tip about lighting, posing, post processing, models, anything as long as it has to do with portraits and photography.
NOTE THIS CATCH:
For a Flickr picture to be eligible to participate, it must have a short (or long explanation) on why you took the portrait of this meaningful person.
I am going to submit my signature black and white portrait of Teri and Avery seen above for the black and white portrait.
Tuesday, August 5, 2008
Get Out There: My Images on Display at a Local Deli

Several of my images are finally on display and available for sale at a Heidi's Deli in downtown Denver! Store owner Marty says he's already had people asking questions about the images and the photographer (I still can't believe that's ME they are asking about!) and picking up my business cards at the register before they leave the deli. Even if I don't sell a single image, the exposure alone could be infinitely beneficial for my burgeoning business. Potential customers might not need my services now, but my business card and postcards will hopefully help them remember me when they do need a photographer.
Many people are wondering how often Marty will display local artists work, too. I don't think he expected to get that kind of a reaction, and he might even consider having a permanent display of some kind always running in the deli. A few of my photography buddies are meeting me for lunch at the deli tomorrow, and I advised all of them to bring their business cards so Marty could have a look at their photos too. All of my friends are extremely talented and much better at landscape photography than I am, since I specialize in people and events. Marty is bound to love their work, too!
It was difficult, as always, trying to figure out how to price my photos. So I just took into account how much it cost for printing the image, and framing and matting it -- then doubled the price. They range from $75 to $125 for images that have already proven to be hot sellers. I had no idea that frames cost so much, ranging from $25 to more than $50 for real wood, and archival mats can run you another $6 to $10 on top of that. No wonder art is so expensive!
If you have a local eatery, coffee shop or bar you frequent, ask the owner if they might be willing to display some of your work. They just might say "Yes!" like Marty did for me. I printed out the waterfall image from Rifle as my "thank you gift" to Marty, but turns out he has been eyeing another shot instead....the close-up of the dandelion clock above. I will just have to give both of them to him!
Instructor's Tip: Fog Filter - Not Just For Fog

Enjoy this week's "Instuctor's Tip" by award winning nature photographer Russ Burden:
"Fog Filter - Not Just for Fog"
A fog filter does just what its name implies. It comes in both the screw in type that threads to the end of a lens and also the rectangular drop in type that slides into a Cokin holder. The screw in kind effects the entire photo but the drop in can be adjusted to impart its effect to a certain area. It can be graduated with the fog section on the top and clear on the bottom.
Although a fog filter’s primary purpose is to portray a foggy appearance, its characteristics allow it to work very well for other purposes.

PORTRAITURE: Women and young kids are great subjects to photograph using a fog filter. It emulates a soft focus effect but it’s more ethereal.
STRONG SUN: In bright sun, there are harsh areas of contrast. The greater the contrast, the harder the edge between the bright and dark areas. At the point of these transitions, a fog filter will create halos of light.
CANDLES: More of a mood can be set rather than just having a scene illuminated by candle light.
BUSY BACKGROUNDS: Real fog has the effect of hiding a busy background. A fog filter, to some degree, will do the same. If you encounter a scene wherein there is a gorgeous foreground but the background is not pleasing, try using the graduated fog filter.
-Russ
The photo(s) in this post were taken by Russ Burden. To learn more about how Russ captured this image, join him on one of his photo tours. Visit Russ Burden Photography to get more information.
To take a class with Russ or a fellow Digital Photo Academy instructor in your area, check out the Digital Photo Academy. I took Russ' intermediate and advanced courses last year, and he continues to be a strong source of knowledge and encouragement as I progress in my photography.
Don't forget to check Take Great Pictures for Russ' most recent tips. On the home page, click on the "Photo Tips And Techniques" button in the left hand column. Additionally, check out his "Digital Tip of the Month" found by clicking on the Digital Photography button.
Subscribe to:
Posts (Atom)


