Showing posts with label post processing. Show all posts

Wednesday, August 26, 2009

Get the Job Done: Testing out a new work flow


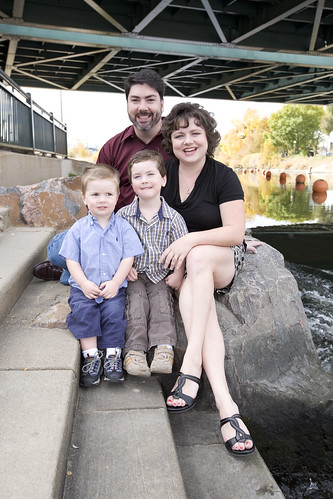
Jordan's senior yearbook picture before:


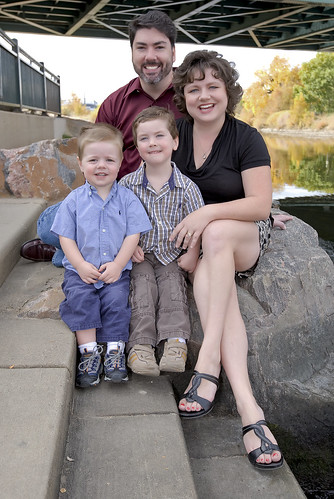
Jordan's senior yearbook picture after post processing:

In an effort to conserve my time and energy during the hectic senior session season, I'm trying out what I think will end up being a major workflow overhaul for my studio. It's still a work in progress, and I may end up adapting the workflow again as I find new ways to manage my time. But I'm going to give this a try for a while.

Currently, I'm running a senior special where I am only editing select photos chosen by the client, including the yearbook picture, two 8x10s, four 5x7s and one sheet of wallets. That's a big change from my old way of doing things. I used to spend days editing every single image from a session (which could mean several hundred). I'd present the client with all the images only to find out later
that they may have only loved 30 to 40 select images. It's inevitable that the clients never seem to like the images that I prefer and everyone you speak too prefers a different image! While I certainly believe a client is paying me for my vision, you just can't ignore the client's personal taste and the decisions they make based on those preferences.

Before, when I had fewer clients, I didn't sweat editing hundreds of images from a single session. I really do love post processing in Photoshop and it helped me gain experience! Clients never saw any of my unedited product until I was completely done post processing it. But since my client load has picked up, and the Rocky Mountain News has closed (meaning everyone still left working at the Denver Post is doing the work of at least two people), I realized that I just couldn't afford to keep editing like that.

So now, I'm trying out a proof method where clients choose a specified amount of photos they want retouched. I have been using the synchronize function in Adobe Camera Raw to auto correct all the files for global edits such as sharpening, noise reduction and exposure compensation. I won't do any blemish fixing, eye or teeth whitening, cropping, etc. unless the client choses that image for the extra work. I am ruthless about culling down the images to the very best because I just don't think it's a good idea to overwhelm a client with hundreds of images from a one- or two-hour session. I cut out duplicates, and if I immediately see that I want to change an image to black and white, I will do that to give the client an idea of what the finished product would look like.


BEFORE


AFTER

It takes less than 30 minutes to batch edit and export the files to a private online proofing gallery this way. The images are watermarked and resized automatically. Some photographers don't agree with this method because they don't want a client to see a less than perfected image. But I think your work flow may ultimately change based on your situation and what the client expects. I know that my senior portrait clients this season have been over-joyed to see their images a day after the shoot while the excitement over the session is still fresh. The process has especially worked great for several seniors who were on a tight turnaround schedule to get their photos into yearbook staffs in a matter of weeks.

Of course, the best way to make a workflow like this successful is to make sure you get as great an image in camera as possible instead of relying on "fixing it later" in post-processing. That may take a little more prep time in the front end, but it's worth it when you get compliments like this from clients:

"OMG, we had a hard time trying to decide what photos we wanted! They are all so good!! U did an awesome job!!" says Monique D., the mother of one of my seniors named Jordan. I had Jordan's final chosen pics edited in less than an hour!


BEFORE


AFTER

I'm also contemplating taking the workflow one step further by editing my favorite 15to 20 and only showing clients those images in a final format. If they're not satisfied, I would allow them to see all of the proofs to select others to edit. New marketing research has shown that reducing the range of options by offering only a limited selection of products keeps the client from getting paralyzed by too much choice, leading to lackluster sales. I don't want my clients to get so overwhelmed that they decide not to purchase anything at all.

What's your proofing and editing process method?

Thursday, December 18, 2008

Get the Job Done: Creative Post Processing with Photoshop

I recently posted about getting more adventurous in my photo post processing now that I've got several Photoshop classes under my belt. Here is the final composite of the family portrait shot I took of the Newell Family at the South Platte River in Denver. I want to thank Armando Martinez, owner of the Mando-Matic retouching studio, for walking me through the steps to correct some issues I had with the original image, including a distracting background element (a bridge) and faces turned the wrong direction when I pushed the shutter.


Here is the BEFORE, RAW unprocessed image. After I carefully posed the family on the rocks near the river, Tristan got distracted and turned his head:
Before

Here is the MID-AFTER processed shot where I copied a portion of Tristan's face from another photo looking straight ahead at me and placed it on top of the other image. This shot also includes some normal curve adjustments and portrait glamour work to even out the skin tones, brighten eyes and whiten teeth.

After: Step One

I carefully selected a portion of Tristan's face that included his eyes, his noise, lips and rosy cheeks, feathering the selection so the edges would blend in seamlessly and copied it. Then I dragged that selection onto the other original photo, which automatically created a new layer.

As it turned out, the new image of Tristan's face was much larger than the original, so I had to use the Free Transform mode (under "Edit") to reshape the face and fit it smoothly over the original. I combined the layers and healed the edges of the new selected face to make sure it blended with the existing head. I also replaced the bridge in the upper left hand frame with more autumn leaves.


As I thought, I still wasn't done with the image. I needed to get rid of that bridge and the more I looked at Liam's face, the more I realized that I wanted his eyes looking at me. I used the same steps to replace Liam's face. I "pulled down" Tristan's pants, so to speak using the clone and heal tool. Then I used some of the techniques I learned during Armando's Photoshop 2 class to blend aspects of images using quick mask selections and the darken mode.

Armando allowed me to use this image he took of a blue sky with puffy clouds:


1) In a new layer, I selected the background behind the family with a quick mask. I tried using the magic wand at first, but it was too difficult to select around hair. Using the brush in the quick mask mode gives you more control. I used the clone tool to copy portions of the sky into my image. Then I used the "darken mode" on the entire layer to help the sky blend in more.

2) To keep the sky in perspective to distance from the subjects, I used guassian blur to fade the sky a little bit, making it appear further away from the subjects.

I am glad I put so much effort into this image because as it turns out that is the one they want for their holiday cards! :)
To learn more about how to use Photoshop to enhance your pictures, take a class with Armando at Illuminate Workshops.

Thursday, November 13, 2008

Get the Job Done: Creative Post Processing with Photoshop

I have grown more adventurous in my photo processing now that I have had several Photoshop classes under my belt, including two offered at Illuminate Photography Workshops by instructors Nat Coalson and Armando Martinez. I decided to try some creative retouching with some of the photos I took during a family portrait session earlier this month.

Overall the photos I took of the Newell family were very successful. However, I had a devil of a time making sure that both boys were always looking at me during the posed shots. Their attention spans were very short, since they are only 4- and 2-years old, and one or both would often look away right as I pressed the shutter.
Thank goodness there were plenty of other images where both boys are looking straight ahead. I was able to combine success aspects of one photo with another to create a new photo composite.

Here is the BEFORE, RAW unprocess image. After I carefully posed the family on the rocks near the South Platte River and took a few steps back to compose my image, something caught little Tristan's eye, and he looked to the side right as I shot the photo.
Before

and here is the AFTER, processed. I copied a portion of Tristan's smiling face (in the looking straight ahead at me) from another photo and placed it on top of the other image where he is looking off to the side.
After: Step One

The first step in my photo processing in Camera Raw included cropping the image, and making some color balance and curve adjustments. Once the image was called up into Photoshop, I used some glamour processing to whiten teeth and eyes, heal out wrinkles, and balance out overblown skin tones. I also used "Clone" to take out the distracting orange markers in the river in the upper right hand corner of the frame. I saved that image as a TIFF keeping all the adjustment layers intact and opened this new image that had Tristan looking directly into camera.


I carefully selected a portion of Tristan's face that included his eyes, his noise, lips and rosy cheeks, feathering the selection so the edges would blend in seamlessly and copied it. Then I dragged that selection onto the other original photo, which automatically created a new layer.

As it turned out, the new image of Tristan's face was much larger than the original, so I had to use the Free Transform mode (under "Edit") to reshape the face and fit it smoothly over the original. I combined the layers and healed the edges of the new selected face to make sure it blended with the existing head.

I don't think I'm done with this image yet. I like Liam's smile in the second image better as well, so I may try to replace his face in the main image. That featureless white sky is bothersome to me, so I may add a new blue sky with some puffy clouds into the photo. And I don't like the bottom of the bridge at the top of the frame. Does the post processing ever end? Only when I get it right in camera the first time like I'm supposed too, I guess! ;)

Friday, September 26, 2008

This Weekend: Editing Images from Denver, Food and Wine Classic


This weekend, I will finish up editing the photos from the Denver, Food and Wine Classic event I covered for the Auraria Higher Education Center. These photos are looking great and I'm very proud of them so far, so I believe the media relations director will be pleased too. She intends to use them on the AHEC website to promote the center as a great venue for multiple events, including weddings and festivals.

I'm not sure why I love the shot above, but it's one of my favorites so far from the event. Every person who attended the food and wine classic received this commemorative glass that fit snugly into a plastic plate -- a perfect set designed for taste-testing. Throughout the day, these glasses overflowed with some of the best tasting alcoholic beverages I've ever had. And while I took photos of people entering the event and being handed the glasses and plates by volunteers, this fun shot of a volunteer holding up one of the glasses just better captures the moment for me.

I'm going to take advantage of the lull in photography assignments for a few weeks to do some advertising of my own for the upcoming holiday season. I also plan on getting back into some classes and "shoot and greets" with some fellow colleagues. One of my favorite things about photography is the opportunities for continuous learning....everyday there is something new to help make me a better photographer!

Sunday, September 14, 2008

Growing Pains: Letting Clients See Unedited Photos (Part 2)

Nina's pick for her senior portrait


Today I finished editing my last trio of senior portraits referred from Jordan. It was a great pleasure to be able to shoot these lovely young ladies and capture memories of this very important year in their lives. I hope I have given them photos they can cherish for years to come. And it's wonderful to think that my images will be printed inside a yearbook! Thank you ladies for giving me this opportunity, and now I have examples to send to schools across the metro area in hopes of securing more senior portrait sessions next year. I have also been following the work of Anne Martin, a Dallas-area photographer and blogger who specializes in senior portraits. Martin does a tremendous job, and her images have been a great source of inspiration. I love the section on her site that discusses "Senior Secrets," and I will definitely share these tips with my future senior portrait clients to help them prepare for the session.

Gloria's pick for her senior portrait


Last week, I blogged about a new work flow I would be trying out during my post processing of Nina's pictures. I had been worried that editing all of my images before I presented them to the client took too much time, especially when it was clear the client preferred some shots over others. I decided to try a different tactic and allow Nina to see unedited proofs. Thankfully, the majority of the images I took looked great coming straight out of camera, or I wouldn't have had the courage to do this. I think that if you are going to go this route, it's even more important for you to take the time to get the shot right instead of relying on Photoshop to save you later. Nina and her mother had already had the chance to see the result from sessions I completed with Jordan and Gloria and knew that I could produce. But I was still more than a little nervous going into this.

Jordan's pick for her senior portrait


Out of 100 or so images, Nina chose about 20 shots that she wanted fully processed. That alone saved me days worth of editing, and I was able to get all of her favorites (plus about 10 of my own to use in my port) done in a single afternoon! Overall, I think this process worked well. For my next portrait session, I may process one or two images to the max just to give my client an idea of what to expect when I show them proofs.

It will be interesting to see if the process works the same with the several hundred wedding reception shots I took yesterday. With more than 500 images, I would hate to spend time editing photos that the client doesn't want. But there's a big difference between the 25 to 50 shots clients get from a portrait session versus the 150 to 200 shots promised them from an event. More to come on this topic later.

Friday, September 12, 2008

This Weekend: Shooting a Wedding Reception


This weekend, I will be shooting a wedding reception with my friend and fellow photog Jason Peckovitch. The couple had a small wedding ceremony, and decided to spend the bulk of their money on a larger reception for family and friends. One of the things I've been wanting to try out is to have another photographer on hand to take portraits during an event in hopes that it would create more sales. I'm not sure if that idea will work, but I thought I could give it a try at this event.

I will also be editing like crazy, including my last round of senior portraits, a fashion shoot I shot last weekend and the food expo as well! No rest for the weary (or the wicked)!

Monday, September 8, 2008

Get the Goods: Photoshop Portrait Makeover Tutorials, Whitening Teeth and Eyes

Last week, Digital Photography School released some sorely sought after Photoshop tutorials to help portrait photographers makeover their subjects. I wanted to personally thank DPS forum member Yanik (image-y) for putting together these amazing series that will be exceptional additions to our post-processing workflows.

I often use plug-ins such as Portraiture to quickly do "glamour makeovers." But a little bit of these type of programs goes a long way -- sometimes too far, I think, leaving the subject looking over-processed and plastic unless you tone the opacity down on your glamour duplicate layer. Learning to do piecemeal techniques such as whitening teeth and eyes, removing pimples and wrinkles, creating makeup and changing eye color might take longer. But I think it could ultimately give you more control in your editing to create realistic makeovers that retain a client's natural beauty without making them look overdone. I can't wait to try these out. If you haven't joined the Digital Photography School forum and receive their update emails, this is definitely a great reason to do so because the school helps you stay on top of new technology and techniques that can make you a better photographer.

Part 1: Whitening Teeth & Eyes


New ideas I culled from this video:
1) use desaturation to tone back yellow teeth or red eyes
2) keep your selection feathered with at least a 1 pixel so your edges won't be hard
3) keep things natural by using a soft touch in your editing.
4) learn how to do both the "lazy" and "more precise" methods so you can use both depending on how much time you have to edit.

If you know of any other ways to do these techniques, please leave a comment here to "share your wisdom" as Yanik suggests. I will present each of these tutorials throughout the week, so make sure to come back!

Sunday, August 31, 2008

Growing Pains: Don't Make This Terrible Mistake

My friend and photo colleague Tiffany Trott was right on the mark in her blog post today at 23photos.com when she suggested that photographers reset their camera settings before putting away their equipment.

I made the terrible mistake of not checking my settings during a shoot at the Democratic National Convention. The night before, I had been inside a dark museum, requiring me to boost my ISO to the highest setting possible on my Canon 5D, which was an amazing 3600! My shots were perfect from that night, but I forgot to change those settings the very next day when I was shooting in broad daylight in front of Mezcal when celebrities associated with the Creative Coalition made another appearance.

I didn't realize my mistake until I uploaded the photos for post processing. As you can image, the increased ISO made the photos incredibly grainy and the color noise was out of this world, peppering darker African-American skin tones with speckles of blue, green and red. I was so sick to my stomach, I thought I was going to vomit! Some noise correction in Photoshop took care of most of it, but some of the shots just couldn't be saved.

From this point on, I would advise all of us to take Tiffany's advice. Don't store your gear away without resetting to your basic shooting mode. For me that's ISO 100 and turning the dial back to Manual or Aperture Priority. It's a great routine to have and include in your overall work flow.

Saturday, June 14, 2008

This Weekend: Almost Finished Editing Wedding Shots


The calls are coming in and the natives are getting restless: People want to see the wedding shots and I have just two more sets to finish editing. All in all, completing this assignment has helped propel my burgeoning photographic career. I am still in talks with the college working out a freelance contract and several families who attended the wedding want to hire me for various shots, including family portraits. And the bride wants to surprise her new hubby with some lovely artistic nudes! Wish me luck making it through the weekend. I hope to have everything done by Monday morning!

Best Posts

Picture Your World Photography is a premiere photographer in the Denver, Colorado Photographer community on MarketingTool.com.