Showing posts with label Nathaniel Coalson. Show all posts

Thursday, November 13, 2008

Get the Job Done: Creative Post Processing with Photoshop

I have grown more adventurous in my photo processing now that I have had several Photoshop classes under my belt, including two offered at Illuminate Photography Workshops by instructors Nat Coalson and Armando Martinez. I decided to try some creative retouching with some of the photos I took during a family portrait session earlier this month.

Overall the photos I took of the Newell family were very successful. However, I had a devil of a time making sure that both boys were always looking at me during the posed shots. Their attention spans were very short, since they are only 4- and 2-years old, and one or both would often look away right as I pressed the shutter.
Thank goodness there were plenty of other images where both boys are looking straight ahead. I was able to combine success aspects of one photo with another to create a new photo composite.

Here is the BEFORE, RAW unprocess image. After I carefully posed the family on the rocks near the South Platte River and took a few steps back to compose my image, something caught little Tristan's eye, and he looked to the side right as I shot the photo.
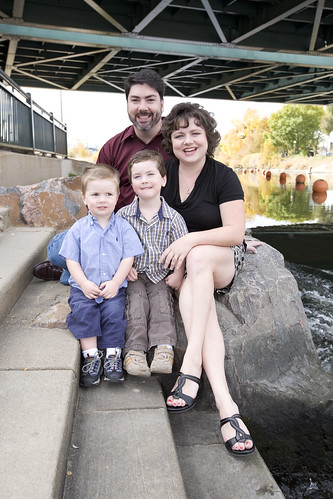
Before

and here is the AFTER, processed. I copied a portion of Tristan's smiling face (in the looking straight ahead at me) from another photo and placed it on top of the other image where he is looking off to the side.
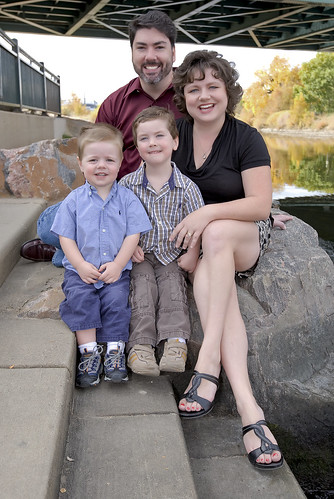
After: Step One

The first step in my photo processing in Camera Raw included cropping the image, and making some color balance and curve adjustments. Once the image was called up into Photoshop, I used some glamour processing to whiten teeth and eyes, heal out wrinkles, and balance out overblown skin tones. I also used "Clone" to take out the distracting orange markers in the river in the upper right hand corner of the frame. I saved that image as a TIFF keeping all the adjustment layers intact and opened this new image that had Tristan looking directly into camera.
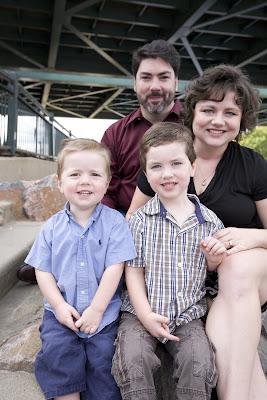


I carefully selected a portion of Tristan's face that included his eyes, his noise, lips and rosy cheeks, feathering the selection so the edges would blend in seamlessly and copied it. Then I dragged that selection onto the other original photo, which automatically created a new layer.

As it turned out, the new image of Tristan's face was much larger than the original, so I had to use the Free Transform mode (under "Edit") to reshape the face and fit it smoothly over the original. I combined the layers and healed the edges of the new selected face to make sure it blended with the existing head.

I don't think I'm done with this image yet. I like Liam's smile in the second image better as well, so I may try to replace his face in the main image. That featureless white sky is bothersome to me, so I may add a new blue sky with some puffy clouds into the photo. And I don't like the bottom of the bridge at the top of the frame. Does the post processing ever end? Only when I get it right in camera the first time like I'm supposed too, I guess! ;)

Wednesday, March 26, 2008

Get the Goods: Essential Photoshop Keyboard Shortcuts

I got so much great information out of just my first three-hour class with Nat Coalson, a certified Adobe Photoshop expert, that I couldn't wait to share it. Here is a list of his essential PhotoShop keyboard shortcuts. These shortcuts are listed for Windows. For a Mac, substitute the Command (Apple) key for the Control (CTRL) key. Most of these commands also work in Photoshop Elements for those who have yet to upgrade.

Nat assures me that if I take the time to learn these shortcuts, my editing process will be more streamlined. EEK!!!!That's going to be tough, I think since I have both a Mac and a PC. For more tips or to take a class with Nat Coalson check out his website (see link above) or Illuminate Photography Workshops.

There are two main kinds of shortcuts in Photoshop -- those that switch between tools and those that execute a command.

TOOL Shortcuts: press the letter on the keyboard to switch to that tool. Though the letters are shown in caps, you don't need to hold the shift key. Hold the shift key along with the letter key to switch to the other versions of the tool.

Move..................................................................V
Marquee selection (rectangular and elliptical)........................M
Lasso tools (freehand and polygon)....................................L
Quick Select and Magic Wand...........................................W
Crop tool.............................................................C
Healing brushes.......................................................J
Clone stamp...........................................................S
Paintbrush............................................................B
Gradient..............................................................G
Type..................................................................T
Increase Brush Size...................................................]
Decrease Brush Size...................................................[

NAVIGATION Shortcuts
Zoom in...............................................................CTRL +
Zoom out..............................................................CTRL -
Pan image.........................................Hold Spacebar & drag image

MENU COMMAND Shortcuts
New...................................................................CTRL N
Open..................................................................CTRL O
Close.................................................................CTRL W
Save..................................................................CTRL S
Save As.........................................................Shift CTRL S
Print.................................................................CTRL P
Fill............................................................... Shift F5
Free Transform........................................................CTRL T
Levels................................................................CTRL L
Hue and Saturation....................................................CTRL U
Curves................................................................CTRL M
Invert................................................................CTRL I
New Layer.......................................................Shift CTRL N
Merge Visible onto New Layer.............................Shift Option CTRL E
Select All............................................................CTRL A
Deselect..............................................................CTRL D
Invert Selection................................................Shift CTRL I
Feather Selection..............................................Option CTRL D
Show/Hide Selection Borders...........................................CTRL H
Show/Hide Rulers......................................................CTRL R

Tuesday, March 25, 2008

Get the Goods: Photoshop Basics -- Digital Photo Workflow

Monday night, I took a Photoshop 101 course with the newly established Illuminate Photography Workshops. Even though I completed an online Photoshop CS2 course last year, I thought I could fill in some of the gaps with hands-on, traditional instruction. Plus I enjoy being able to interact with and learn from fellow students.

Instructor Nathaniel Coalson is an Adobe Certified Expert and was extremely knowledgeable. He helped me pinpoint some shortcomings in my own digital photo workflow -- mainly how I should integrate backups and save my master files as TIF (rather than PSD) to avoid compression and maintain original resolution.

I think what's key to note is that you have to develop a workflow that works for you. Feel feel to tweak this as long as whatever you come up with makes things easier and faster for you to produce the best images possible.

Here are Coalson's tips:

1. Capture: Capture your photos in either RAW or JPG mode. RAW provides the highest quality but requires processing in the computer. JPG is lower quality but can be viewed and shared (such as in email attachments) right from the camera.

2. Transfer Images to Computer: Use a card reader (do not upload directly from camera) and copy the files to your computer. Immediately make a backup onto another hard drive or removable media such as CD/DVD. Depending on the software available, you can automatically rename the copied files, convert to other file formats and add metadta during the copy. If using catalog software, import the images into your database during this step.

I MUST get into the habit of backing up my images as soon as possible. I tend to wait until I have finished editing, then I save the edited versions. But I like Coalson's idea of fitting this early into the workflow so it becomes as second nature to me as sharpening or editing for color balance.

3. Review your edit: Use your file browsing software to review the photos from the shoot(s) and begin rating them for further processing. Mark your selects with flags, stars, labels, etc. to filter them from the rejected files. Delete the rejected files to save disk space. For the remaining images, add more detailed metadata, especially copyright notices and keywords. Sort the images as desired and create collections.

4. Process selects: Using your photo editing software, process your selected images to perfection. Consider tone and contrast (the range of light to dark) color (accuracy and saturation), sharpness and the need for cropping and retouching. Apply creative effects such as black-and-white conversion, colorizing, multiple image composites, localized dodging and burning in this step.

5. Save master and derivative files: A derivative file is any file that would be saved off your master. Using Adobe software, open your file and "Save As" a TIF. TIF files work with the nondestructive editing principle that says to leave a way for yourself to go back in later and make changes. You can also save flattened and resize files for other purposes, including JPG for the web, etc. If you intend to make prints of your photos, prepare the necessary files during this step. Make regular backups of your working files.

I asked Coalson about some problems I had been having saving PSD files in CS3. I could save an image as a PSD, but I had trouble reopening the file. Sometimes it would appear and other times it wouldn't. Coalson said the problem is well-known and yet another reason why TIF files might be a better choice.

6. Print and Present: Using your finished image files, you can make your own prints or send them to a lab for printing, uploading them to a web site, email them to friends, make multimedia presentations, etc. The requirements and specifications for these scenarios will depend on the situation.

Best Posts

Picture Your World Photography is a premiere photographer in the Denver, Colorado Photographer community on MarketingTool.com.