

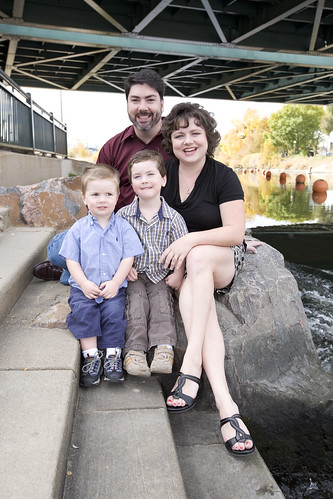
Here is the BEFORE, RAW unprocessed image. After I carefully posed the family on the rocks near the river, Tristan got distracted and turned his head:
Here is the MID-AFTER processed shot where I copied a portion of Tristan's face from another photo looking straight ahead at me and placed it on top of the other image. This shot also includes some normal curve adjustments and portrait glamour work to even out the skin tones, brighten eyes and whiten teeth.
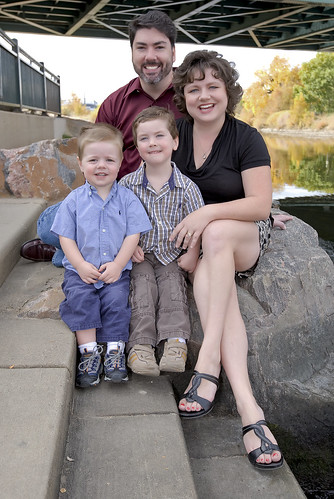
I carefully selected a portion of Tristan's face that included his eyes, his noise, lips and rosy cheeks, feathering the selection so the edges would blend in seamlessly and copied it. Then I dragged that selection onto the other original photo, which automatically created a new layer.
As it turned out, the new image of Tristan's face was much larger than the original, so I had to use the Free Transform mode (under "Edit") to reshape the face and fit it smoothly over the original. I combined the layers and healed the edges of the new selected face to make sure it blended with the existing head. I also replaced the bridge in the upper left hand frame with more autumn leaves.

As I thought, I still wasn't done with the image. I needed to get rid of that bridge and the more I looked at Liam's face, the more I realized that I wanted his eyes looking at me. I used the same steps to replace Liam's face. I "pulled down" Tristan's pants, so to speak using the clone and heal tool. Then I used some of the techniques I learned during Armando's Photoshop 2 class to blend aspects of images using quick mask selections and the darken mode.
Armando allowed me to use this image he took of a blue sky with puffy clouds:

1) In a new layer, I selected the background behind the family with a quick mask. I tried using the magic wand at first, but it was too difficult to select around hair. Using the brush in the quick mask mode gives you more control. I used the clone tool to copy portions of the sky into my image. Then I used the "darken mode" on the entire layer to help the sky blend in more.
2) To keep the sky in perspective to distance from the subjects, I used guassian blur to fade the sky a little bit, making it appear further away from the subjects.
I am glad I put so much effort into this image because as it turns out that is the one they want for their holiday cards! :)
To learn more about how to use Photoshop to enhance your pictures, take a class with Armando at Illuminate Workshops.


2 comments:
It looks great! showoff :)
LOL! Thank you dear! See you tonight!
Post a Comment