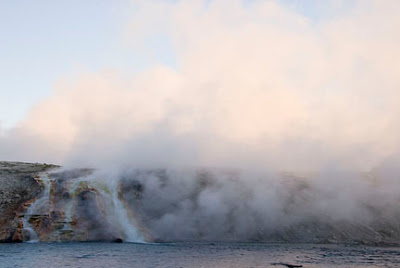
WITHOUT GRADUATED ND

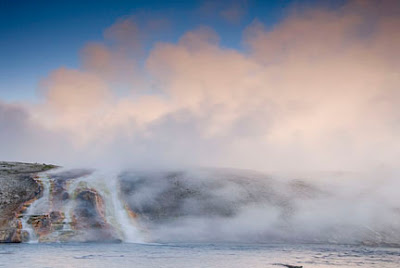
WITH GRADUATED ND
Graduated Neutral Density Filters - Part 1
I recently gave a show at a local camera club and at the end, one photographer asked, “Why do you use filters if you’re shooting digitally?” This brings me to the point of this article. Why is there a mindset that if you’re a digital shooter, you don’t need filters? I want to capture the RAW information with as much perfection as possible. I don’t want Photoshop to become a “rescuer.” I want it to be an “optimizer.” Additionally, I see myself as a photographer, not a mouse wrangler so the less time I spend perfecting the image after the fact, the better.
I know there are multiple approaches to mimic the effect of a graduated neutral density filter using Photoshop, but all take time. The bottom line is it takes a lot more time than the ten seconds it takes me to slide a graduated neutral density filter in front of my lens. Also, I’m firmly of the belief that if the image is worthy of taking up flash card space, it should be captured properly from the get go. This is especially true if you’re still shooting film. I know that the slide or negative can be scanned and corrected, but all these extra steps mean you’re adding unwarranted time to your work flow.
As a photo tour leader to some of the most magnificent locations in the US, much of the instructional work I do with my participants deals with scenics. With this in mind, there are two essential filters that I place on my list of required items for the tour. A graduated neutral density is one along with a polarizer. I recommend the grad filters to tame the contrast when shooting reflections and also to tame contrast at sunrise and sunset. By placing the dark part of the filter over the light part of the image area, the contrast range is tamed producing a more evenly lit photograph. Depending on the situation, it may call for a one, two, or three stop difference. Thankfully, these filters are made in each of these strengths. Additionally, there are soft and hard edge options. If the transition point between the light and dark area is abrupt, it calls for the hard edge variety. Conversely, if there’s a smooth gradation, the soft edge is more beneficial.
Check out Burden's "How To Tips" featured on Outdoor Photographer's website. The seven that are dated February 4th are his. Just underneath the articles, be sure to click on page 1 to see an additional 9.
Don't forget to check Take Great Pictures for Burden's most recent tips. On the home page, click on the "Photo Tips And Techniques" button in the left hand column. Additionally, check out his "Digital Tip of the Month" found by clicking on the Digital Photography button.
To learn more about this subject, join Burden on one of his photo tours.


No comments:
Post a Comment